HOW TO MAKE A DIY WOODEN DOOR MAT
Last week I told you guys about The Home Depot’s awesome DIY WORKSHOP! And today I am here to share my version of the DIY Wood Doormat. I was such fun project, and the outcome is gorgeous!

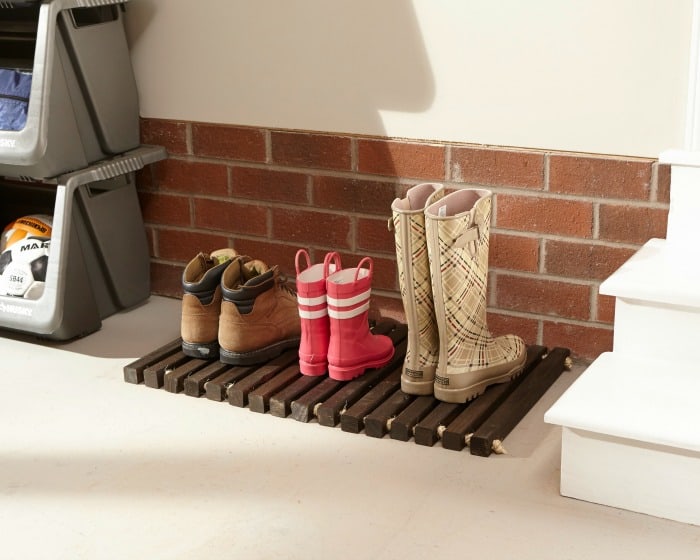
The door mat I made is reversible. Just wait until you see the other side:-)
The original project looked like this on the image below. Some pretty awesome bloggers and I were challenged by THE HOME DEPOT to put our own spin on the project and make it fit our style.
If you want to make your own wooden doormat, mark your calendar and visit the DIY Workshop at your local Home Depot store.
The Home Depot #DIYWorkshop
Saturday, March 26, 2016
10:00 a.m. to 11:30 a.m.

The Home Depot offers Workshops at all of their locations for do-it-yourselfers of all ages and experience levels. There are three types of Workshops offered – Do-ItYourself (DIY), Do-It-Herself (DIH) and Kids. Customers can learn how to build décor projects, how to make easy home repairs and how to operate tools through demonstrations and step-by-step instructions.
And now let me show you how I made this awesome Wooden doormat!
DIY WOOD DOORMAT
Materials
- 8 -36″ x 2″ x 2″ Square End Balusters
- 1 – Natural Sisal Rope
- Wood Stain ( Brown and Colored)
- Paintbrush
Tools:
- Circular Saw
- Drill
- Box Cutter
- Measuring tape
- Pencil
- Sanding block
- Painters Tape
- Gloves
- Safety Goggles
 Steps to make your door mat:
- Measure the wood using tape and pencil in half then cut it. You will have 16 18 ” balusters.
- Using your drill with 3/8″ drill bit, drill holes at both ends of all ( 16) 18″ long sections at 1″ from the end.
- Send the rough edges of the cut.
- Stain all of your 18″ pieces (I used Dark Walnut from Minwax)
- Cut 2 -80″ long pieces of the sisal rope using box cutter
- I taped off each 18″ balusters for 3 – 6″ sections, paying attention to tape it outside of the 6″ on one and inside of the 6″ on the next piece of wood. Then I painted the 6″ sections with my colored wood stain ( weather resistant)

- 7. As a last step, tie a knot at the end of one of the 80″ long rope pieces.Thread the other end of the rope through the hole one end of the baluster sections and tie another knot. Continue threading the rope through the holes. Tie a know at the end of the rope when you get to the end.
And this is the reversible side. I had to put my signature painting on it:-) It’s fun, springy and I love it!


These awesome ladies also put their spin on this fun DIY WOODEN DOORMAT so be sure to check them out!
Glued N Screwed

VISIT THE HOME DEPOT website and REGISTER NOW!
* The Home Depot is partnering with me to participate in this #sponsored Workshops Program. As a part of the Program, I am receiving compensation in the form of products and services, for the purpose of promoting TheHome Depot. All expressed opinions and experiences are my own words.
Have a fabulous week!
Aniko
I’ve been using carpets to put under shoes, but this is even better. I love that is very sustainable because one of these will probably last you many years compared to a carpet. The wonderful idea will integrate this into my home. I thinking of making one as a shoe mat. Thanks for this! very useful. Also, I love how you put your own spin on it. I am into floral designs too.
DIY task is a fantastic job and I feels great to do some DIY working. I got some very good idea about making of DIY wooden door mat and hope it works great. Thanks for the share! Your blog posts are awesome please keep sharing!
Beautiful and practical for down to earth people. But a very very dangerous first step for any woman wearing high heels.
It simply is a lawsuit waiting to happen. A high heel will easily slip and trip up an unsuspecting visitor to your home.
But could be an awesome back door mat!
I probably will make one for my back door!
So fun! Love your spin on it, Aniko!
I love how your mat turned out, Aniko! And it’s reversible – so smart! Thank you SO much for joining me for this Virtual Party – you rocked it girl!
Oh my gosh… I didn’t realize the underside had that amazing PAINTING! So talented and such a fun surprise! LOVE it!
I love these mats Aniko and the flowers are adorable! I might have to give this a try!
Thank you so much, friend! It’s so easy to make, give it shot!
Cutest doormat ever! LOVE it!
Anika this is beautiful! I love the flower side because it looks like a piece of art! Hang that on the wall 🙂
xo – kb
Thanks, Katie:-) Xo
Love the striping! It’s so good! I’m loving the navy color of your door too!
Thanks, Amber! Xo
Beautiful, Aniko! I love that it is reversible!
So lovely!
I love the Spring-y design you added on the other side! So pretty!
I do too, Cristina! Thanks for stopping by!