HOW TO PAINT YOUR FRONT DOOR
This post is brought to you by Modern Masters Inc. All opinions are 100% on my own.
I will show you how to paint front door from beginning to the end.

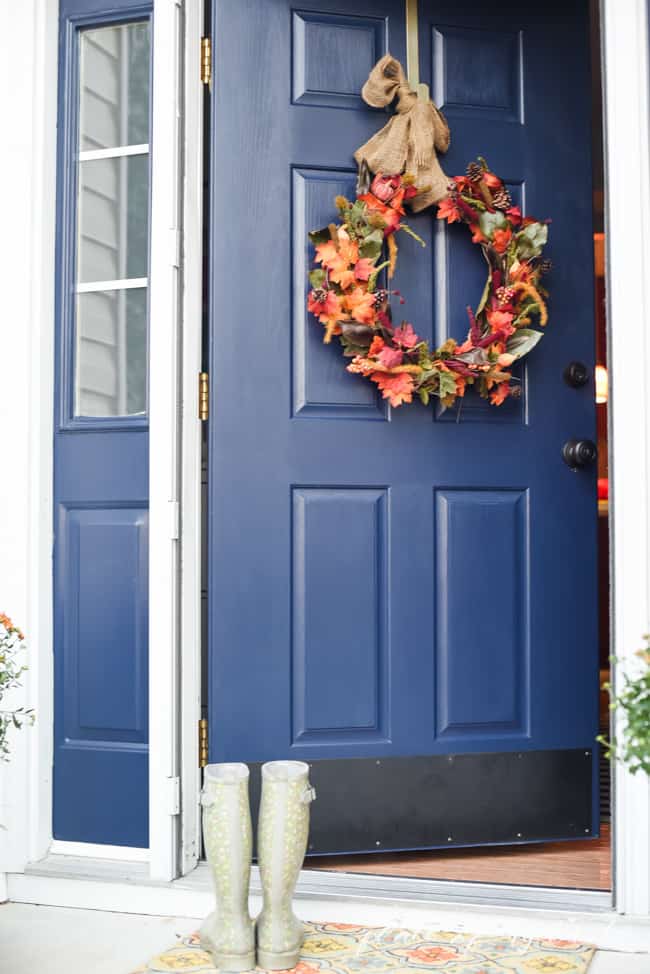
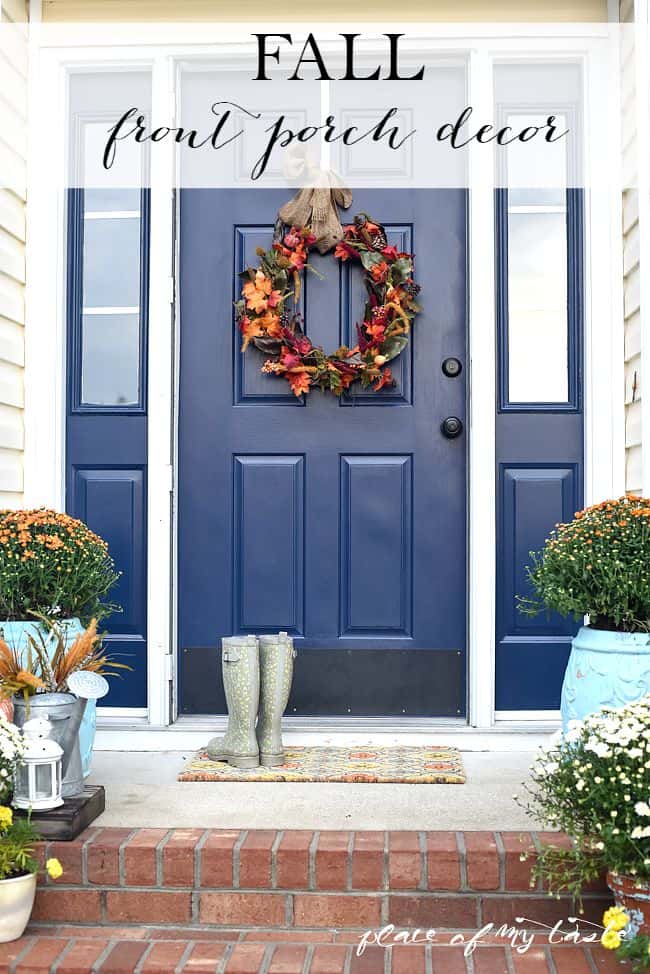
If you dropped in here last week, you must have seen this beautiful blue door while I shared my front porch decor for fall. I painted my front door couple of years ago but never got to share it. Then I painted it again couple weeks ago as I wanted to see a new, fresh color on my door. So today I am going to show you how easy it is to transform your door from blah to amazing in no time. I know some of you might think that painting the front door is a huge time committing painting job to do, but I am going to tell you that it is not. It is easier than you think:-)
Here is a before of my door. Of course, I forgot to snap a picture of it before I started painting but here is an image of my Christmas front door:-) It was kind of green, but I was ready for a change. Replacing the color of your front door gives you an inexpensive update that totally changes the personality of your home. And if you are familiar around here, I love changes:-) A lot.

So let’s roll and let me show you how easy it is to paint your front door.
MATERIALS
- front door paint – I chose MODERN MASTERS – PEACEFUL BLUE
- flat brush ( I used a smaller and larger one as well)
- painters tray
- painters tape
- wet rug


Have you ever heard of Modern Masters FRONT DOOR PAINT? Oh my goodness. I was so happy when I discovered them as they have an excellent color collection for front doors. My kind of colors. All of them are bright and beautiful. For some reason, I am leaning towards blue shades this year ( check out my blue hallway) so I went with Modern Masters Peaceful blue color. These paints are available at some Lowes or online as well. The paint is not– fade and weather resistant and that is awesome!
PAINT FRONT DOOR
STEPS:
- I slightly sanded my door and cleaned the dust off.
- I took off all the hardware to ease my work
- Then I taped the glass and the white boards off around my door to make sure I don’t mess those areas up with blue paint
I started painting the middle cassette and nicely went to cover the full door with paint.


I went on with one coat then I gave another coat to it to finish it beautifully. It relly only took me maybe an hour to paint my front door on a beautiful Tuesday night with a glass of wine while my boys were running around outside:-) I wanted to give my shutters the same sweet finish as well, so I went ahead and covered them with the same paint color. I could take off my shutters, but I chose not to. I taped around the shutters and painted them being installed:-) It worked out well! For the second floor’s shutters, we used tall ladder.

I loved the outcome. I loved the new fresh color. It was an easy update that you can do, too! After the painting was done, all I needed to do is to decorate my lovely front porch. Don’t you think that this gorgeous blue adds a perfect shade to my fall porch decor? Ah, I love it!


I say try to go brave with your color choice! Bright and bold never goes wrong:-)
To remember for this post, pin this image for later

For more inspiration check out the rest of the Fall Front Porch decor
Or learn how to make that cute Fall Wreath with dollar store finds

I hope that I inspired you to get those brushes out and give your front door some personality! It’s worth that little painting time:-)
Cheers my Friends,
Aniko

Have been wanting new color for my front door – thanks for the encouragement! It looks fabulous. One suggestion, paint your wreath hanger same color so it blends in or use Command hook so doesn’t detract from the total esthetic look for the season. Again, love the new overall look!
What did you use for the kick plates?
Love the color of your door and shutters. What color blue did you use? What brand? Does Lowes or Home Depot have this color.?
Modern Masters:: Peaceful blue, and yes, you should be able to find it at Home Depot
The trim on our door was glued on and the glue is running. What can we do to fix that?
Is your door wood?
Hi what shade of blue is this? It’s gorgeous and exactly what I am looking for when we do ours next week! Thank you!
Hola!! Justo ahora he mirado tu blog es hermoso la transformacion tu puerta frontal,esa pintura podría encontrarla en Home Depot gracias
Love your door!! Was wondering what color your house is?
Thanks! The house is light yellow, not sure exactly what the color of it is! Sorry!
How fast did the paint take to dry? And does your wreath hanger leave a mark on the door?
Hi, When you paint the front door are you just doing the outside and inside? Or just the front up the the edge?
Thanks.
I only painted the outside, not the inside!:-)
I hope Lowe’s had this paint!
I am thinking of painting my door, but I don’t quite know how to handle the edges and other side of the door. Did you paint both sides blue? If the 2 sides are different How did you get clean lines in the edges? And did the interior of exterior color end up on the edges? Thank you. 🙂
Hi! I love it! Were your shutters wood or a plastic? Also, when you painted your door did you have to leave the door open for a while to let it dry?
Jessica Fay
lipstickheelsandababy.net
The shutters were plastic and so easy to paint:-) I painted it in the summer or when the weather was warm and I left the door open probably for an hour. It was dry in no time! Have fun painting:-)!
What kind of sandpaper should be used?
Hey There, We used very fine sand paper: like # 220. Hope it helps!
This is gorgeous! Makes me wanna do the same. I have never painted a door before.. And my front door is currently a dark red. I wonder what you did for sanding? You mentioned you slightly sanded but could you give me more info on what you used and if you actually to do it under the current paint is removed?
I love the colour you chose and that you painted the shutters too! This colour stands out way more than the old one. Beautiful work!
Gill- Once I saw your yellow door, I wanted to repaint my blue one-haha! You’ve done an amazing job yourself, girlfriend! Hope you are having a fun Friday! Xo
Did you need two jars because you have sidelights and were doing the shutters as well? I am just curious how much it would take to just paint one door.
Nicole, If you are only doing your front door, one jar would be totally enough. I used about two for all shutters and the sidelights. Hope it helps!
It looks awesome Aniko! LOVE the new colour!!!
Thank you sweet Friend! Hope all is well!XO
I’m curious how you don’t get brush strokes on a metal door. My SIL has delayed painting her door for 6 months now cause the first panel she painted just had tons of brush strokes and now she has a partially painted front door that she tries to ignore. Is it the flat brush you used?
Trisha, I did see some brush strokes with the first coat, but it wasn’t very noticeable. I gave it another coat and as soon as it dried up and the paint smoothened out beautifully. And yes, I used a flat brushes. I smaller one for the small areas and a wider one to cover a larger surface. Hope this helps:-) Have a wonderful day!
I used a brush in the crevices and then a foam roller (small) on all the flat surfaces. No brush marks for me and it was quick