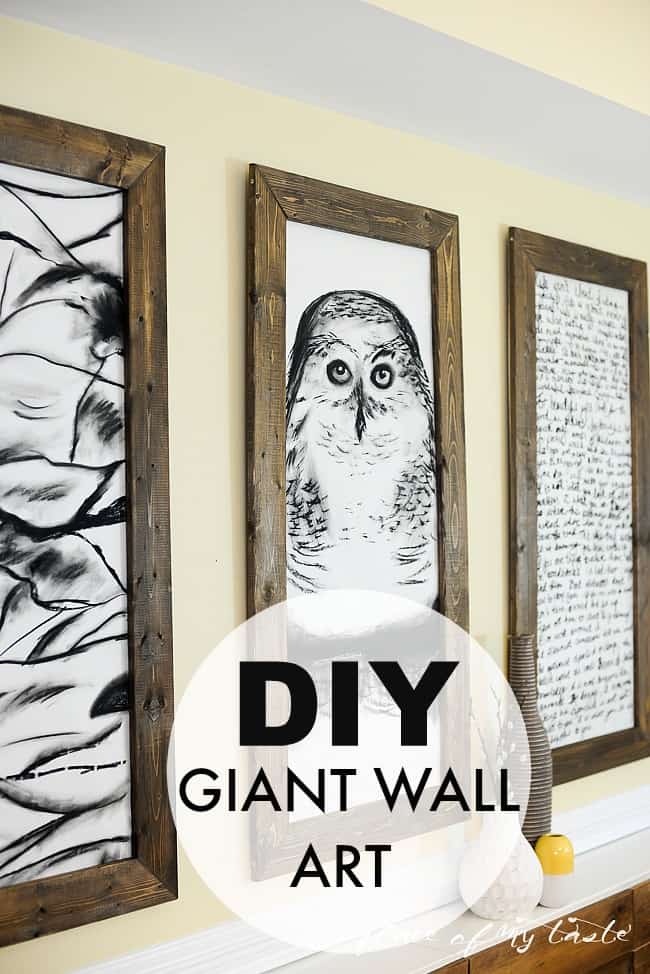
DIY GIANT WALL ART
Make your DIY GIANT WALL ART! It is inexpensive, but very high-end looking!
Art makes our home beautiful, and art made by you makes it unique!
You guys! I am so excited to share this project with you all!
Why?
Because it was spontaneous, absolutely not planned project, and it turned out beautiful.
I think!
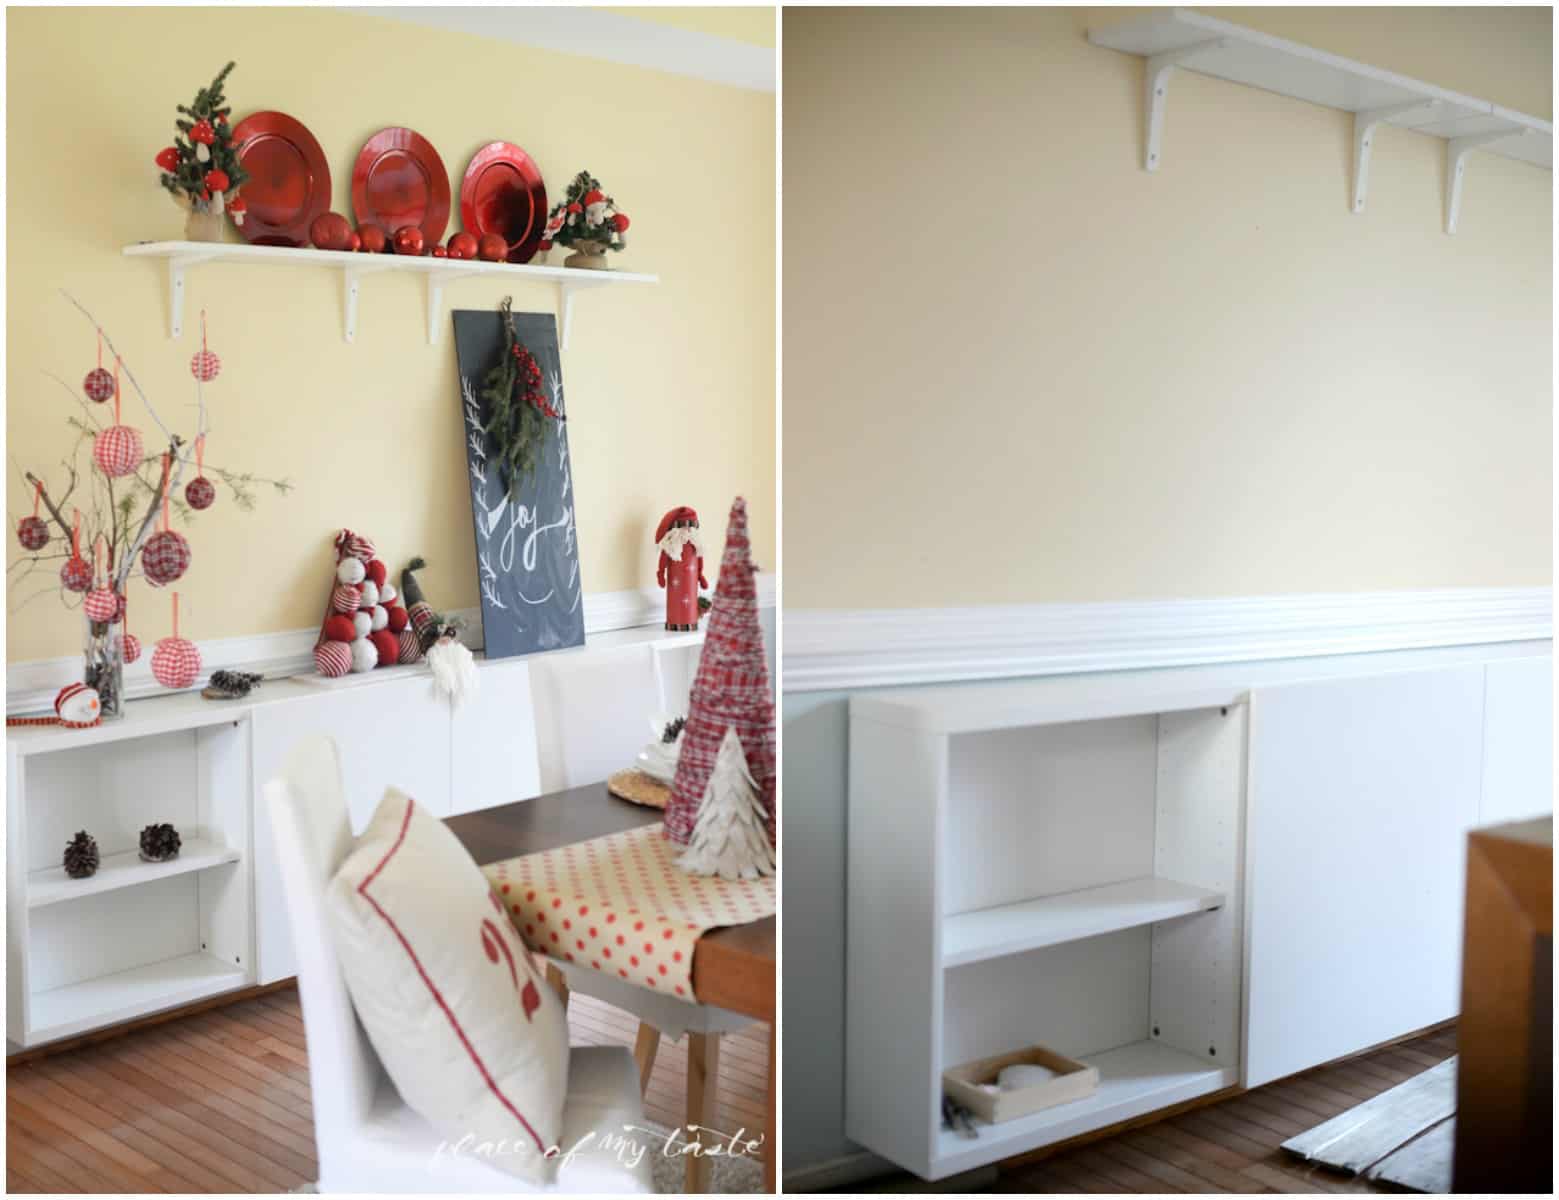
The story began when I took the Christmas decorations down after January 1st.
My dining room was dressed up with pretty plaid and red,
and I adored it during the holidays, but when all those decorations came off,
I was standing in the dining room not knowing what decorations should go up now.
Standing there, I was looking at my pretty bare walls and just hated them!
For a minute or two, I considered putting some winter decorations back,
but had to realize that all of those were very Christmasy.
Here is the Christmasy dining room look and on the right here is the very open look that I had after the holidays.
Pretty empty, right? Needs something, maybe some art?
Then my mind started spinning.
…and spinning.
First I decided to get rid of those shelves. I didn’t like them. At all.
They were not functional but hard to decorate.
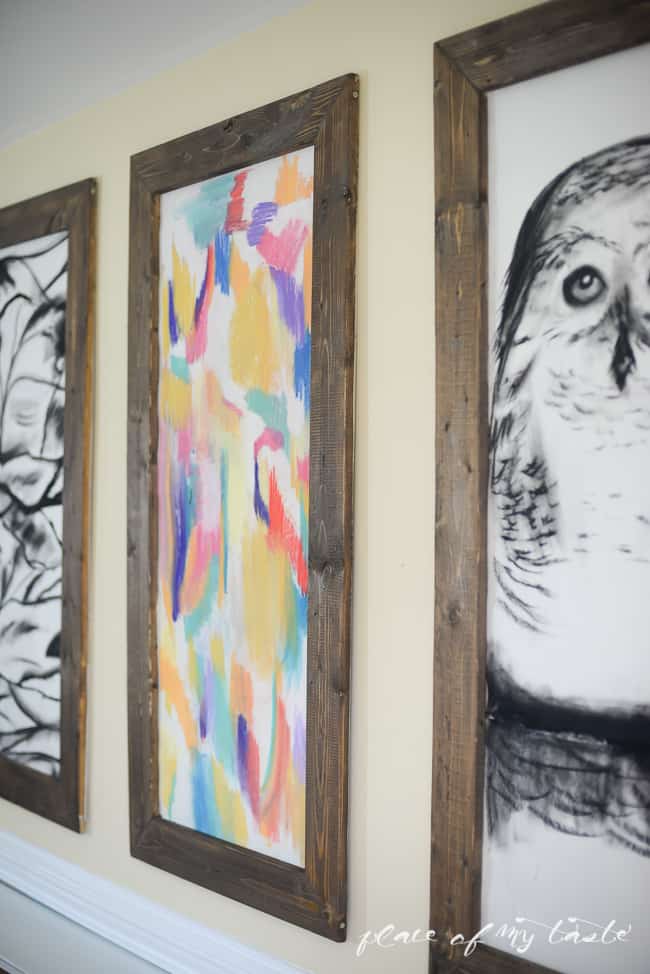
I pictured three huge pieces of wall art on that big empty wall. Yep! It all came to life in my head.
When I told my hubs, he said: NOOOOOOO, no projects!
I had promised him that there was not going to be any project doing in January, but only organizing,
because there is plenty to organize.
I finally talked him into my crazy idea! 🙂
I took a quick trip to The Home Depot to see what kind of material I can find.
I found these guys…for $2.07/piece. Winner!
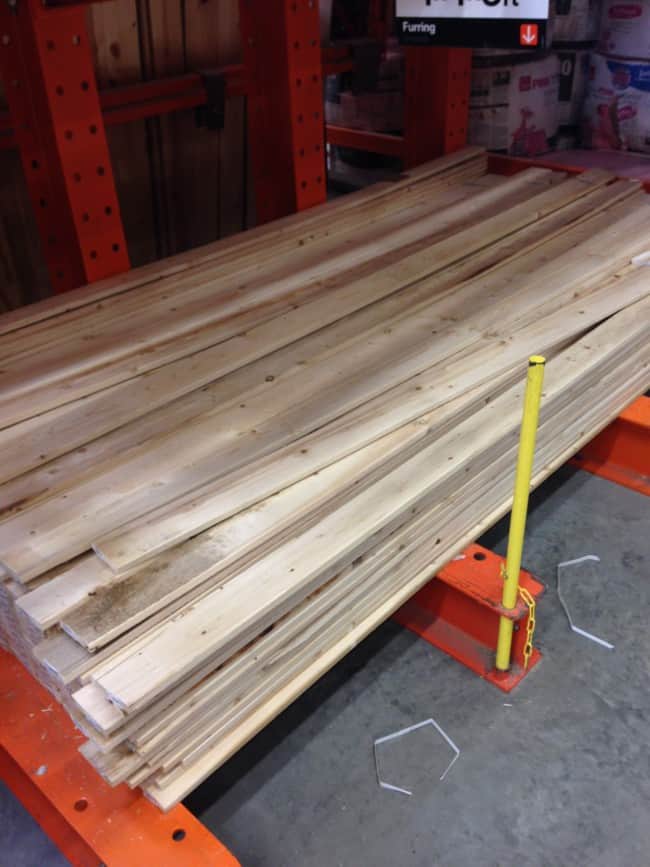
I got five panels to make up three huge frames.
So I pictured three huge pieces of wall art…, okay but what art goes in there..?
I love to create my art. Thankfully I inherited some talent from my father, and I can pretty much draw anything.
I just wish I had more time to draw and paint.
I usually buy large paper rolls at IKEA for my boys, and I thought that this paper would be PEEERRRFECT to fill these frames.
The paper is about 18 inches wide, and I can set the length of the art as long as I want.
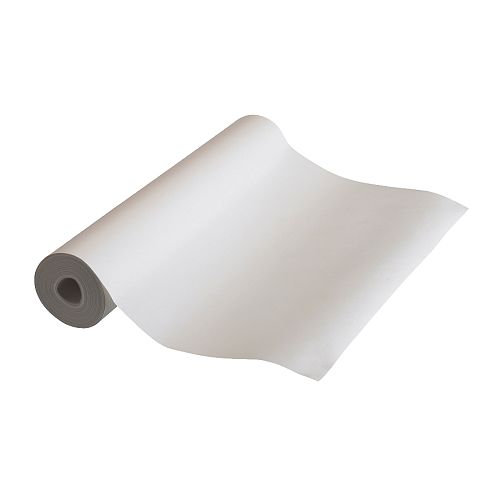
Awesome!
I can get bored pretty quickly with things, so these large frames will be just what I need, where I can draw a new piece of art anytime.
Okay…in case you would like to replicate these large wall frames, let’s get on the project now!
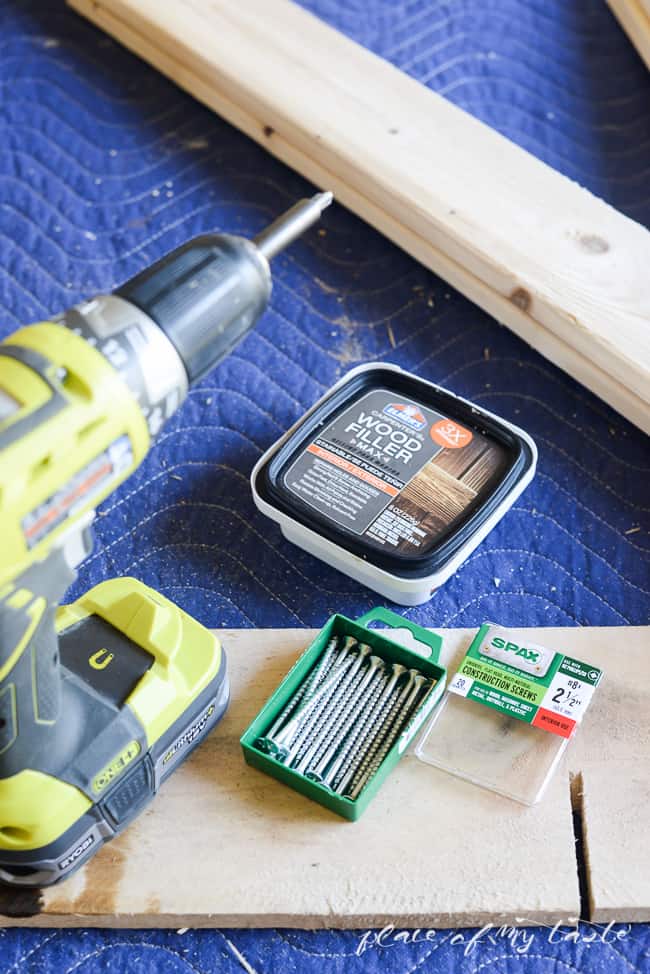
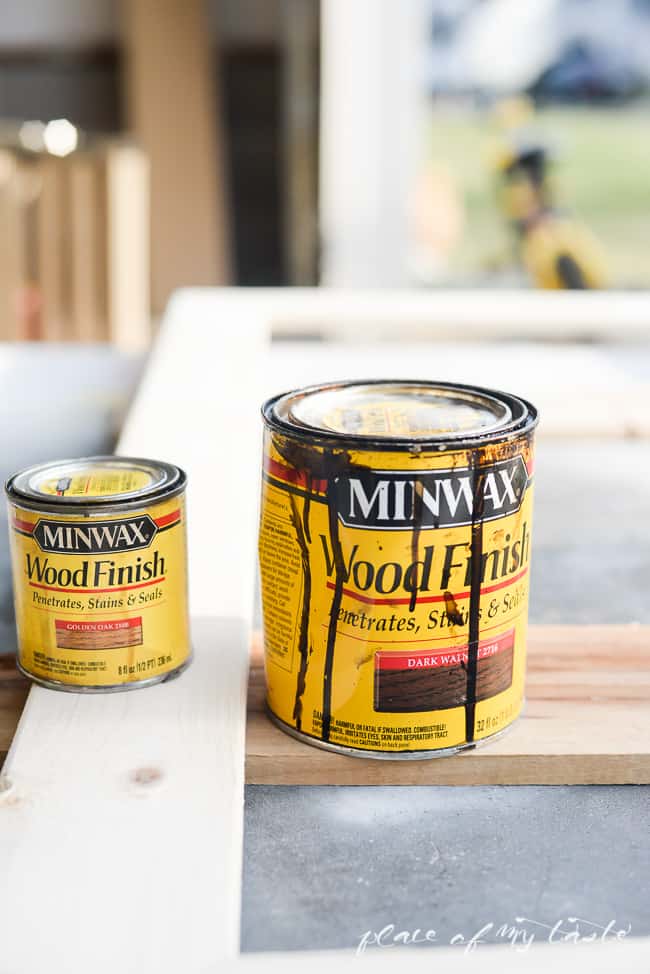
MATERIALS :
– 5 furring strip boards (1″ x 4″ x 8″ $2.07 /pc)
- – Three project panels (for the back of the frame) ($5.49/pc)
– wood stain, one lighter oak and one dark walnut (I had it handy, full can: $3.99 )
– wood screws ($2.87)
– saw tooth hanger
– wood filler (had it already)
[amazon_link asins=’B00QSS9VTO,B00Q2QQL5O,B0000224VG,B000UHMITE,B00006IDXW’ template=’ProductCarousel’ store=’plofmyta-20′ marketplace=’US’ link_id=’e4e349a7-dc6f-11e6-aeab-079635a89f70′][amazon_link asins=’B00QSS9VTO,B00Q2QQL5O,B0000224VG,B000UHMITE,B00006IDXW’ template=’ProductCarousel’ store=’plofmyta-20′ marketplace=’US’ link_id=’e5cdd087-dc6f-11e6-a46a-7dcf83f5b348′]
TOOLS:
– miter saw (so you can cut 45 degrees for the joints)
– drill
– sander
– hammer
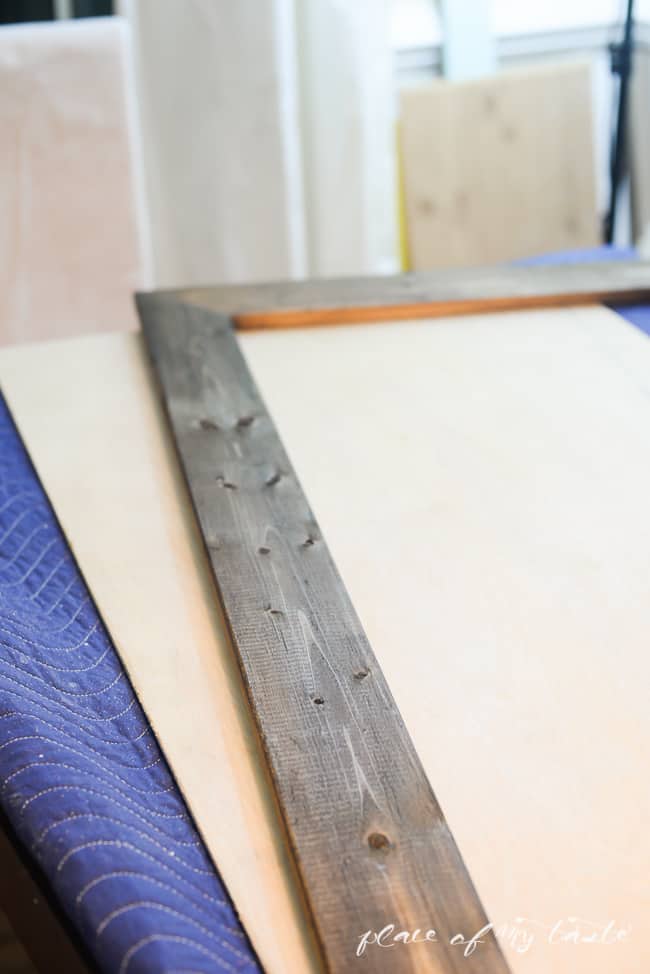
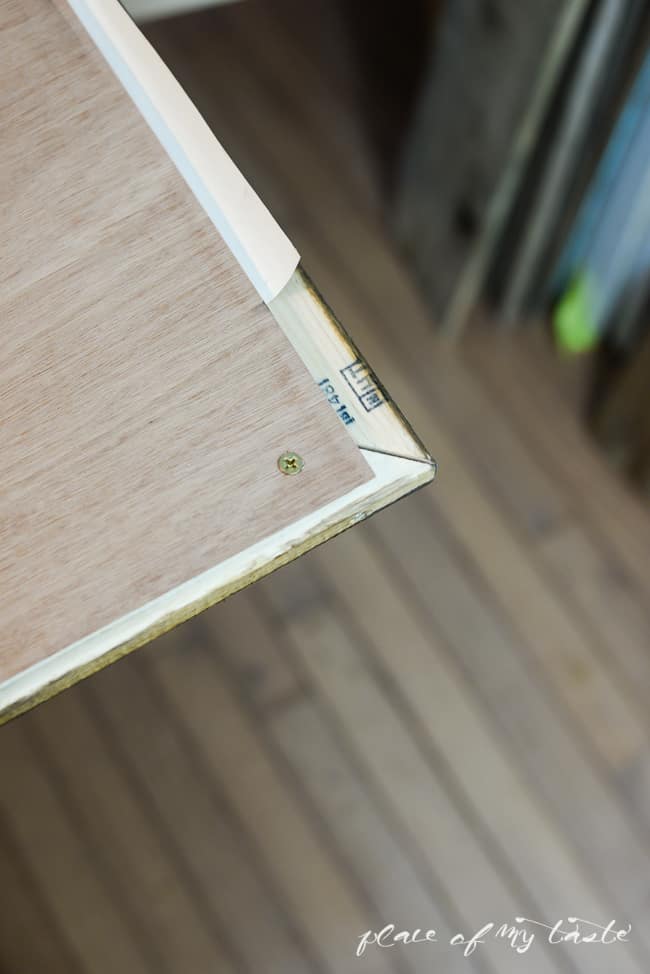
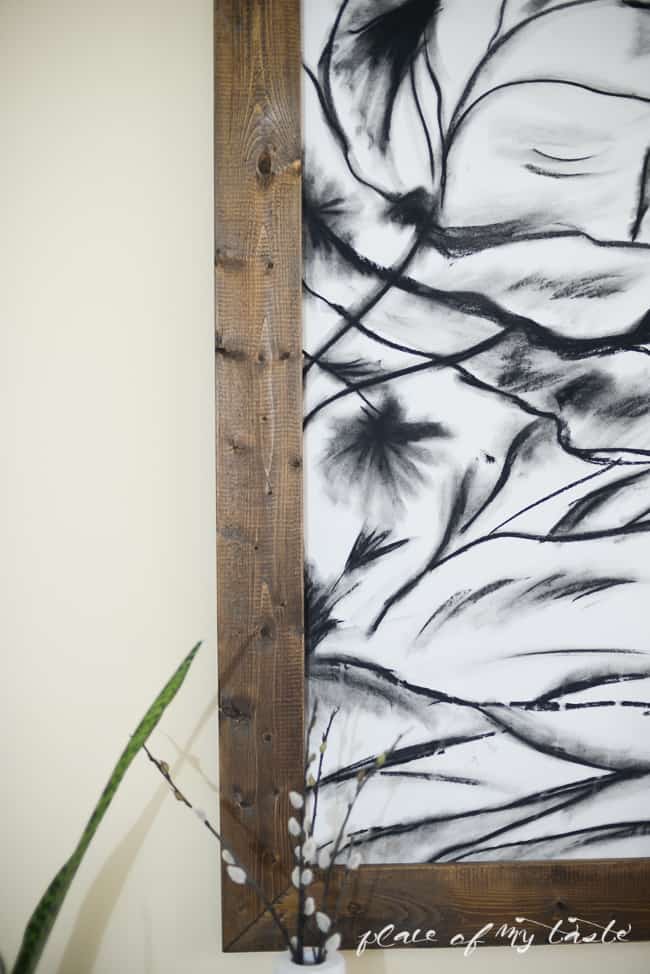
As the first step, we cut the strip boards to the size that we measured out (the frame we made is 24 “x 49” – pretty big).

Then we attached the joints and drilled a hole for the screw on the side of the board. Screwed the 2 1/2 ” screw into the hole we made.
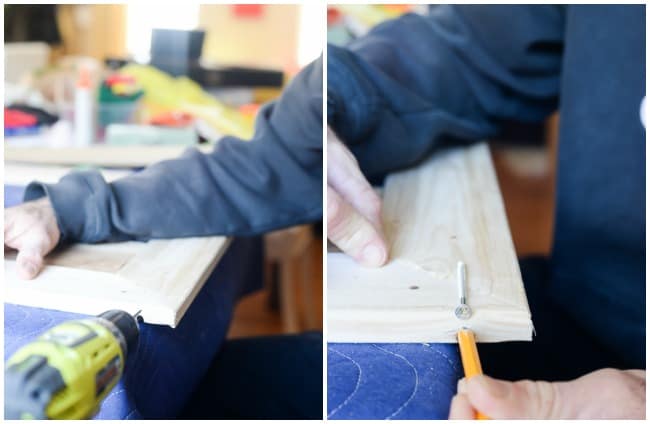
We repeated this on all four corners.
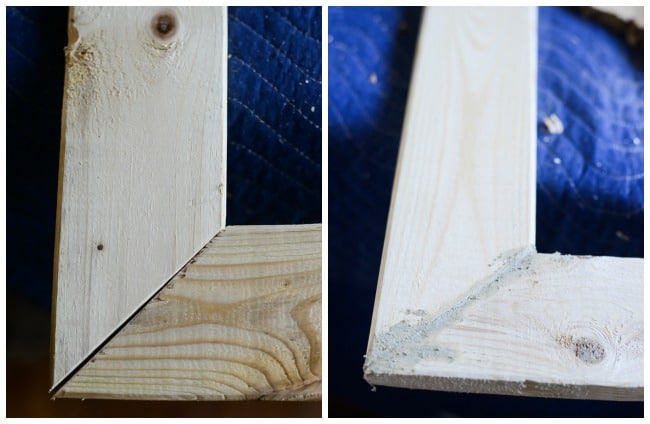
The joints set in almost entirely. Only one side was off slightly, but we filled that tiny gap with wood filler.
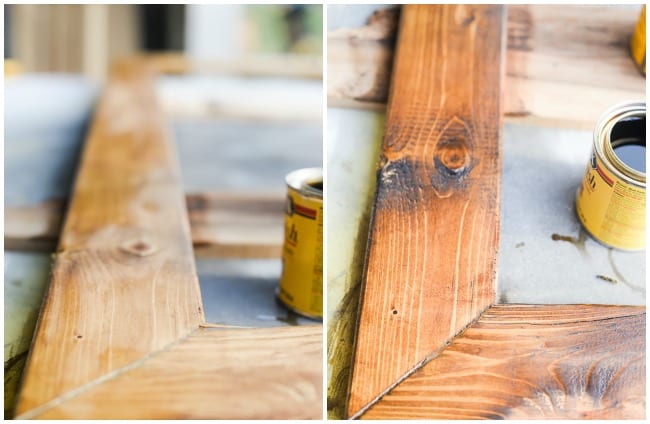
Sanded the surface to be smooth and then stained the frame.
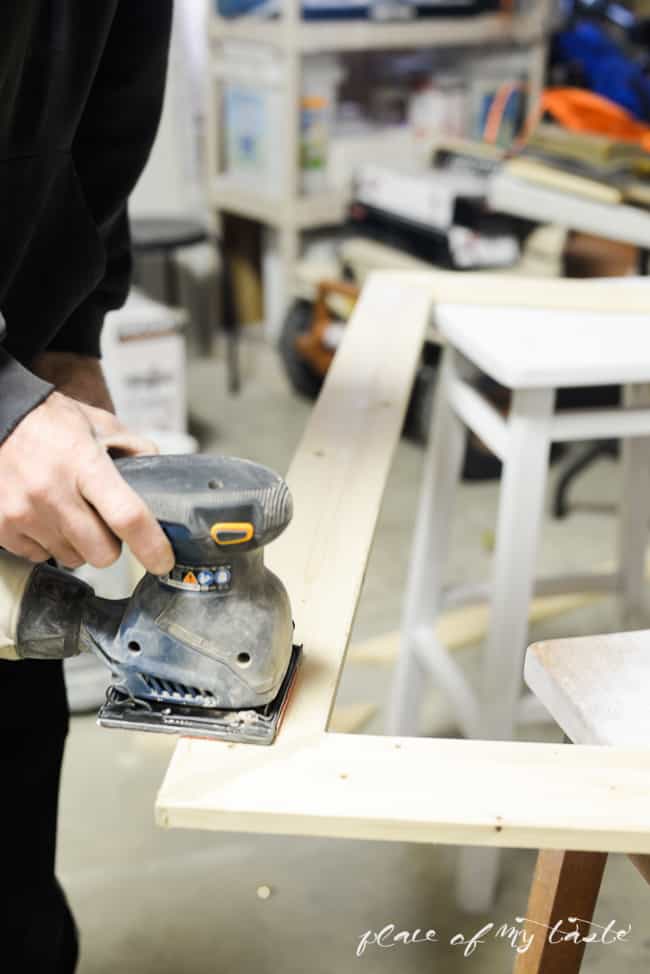
I used two different tones of stain. One lighter and one darker shade.
LIGHTER SHADE: FIRST COAT- Minwax: Golden Oak 210 B
DARKER SHADE: SECOND COAT – Minwax: Dark Walnut 2716
Stained the frame with a lighter than a darker shade to get this lovely color.
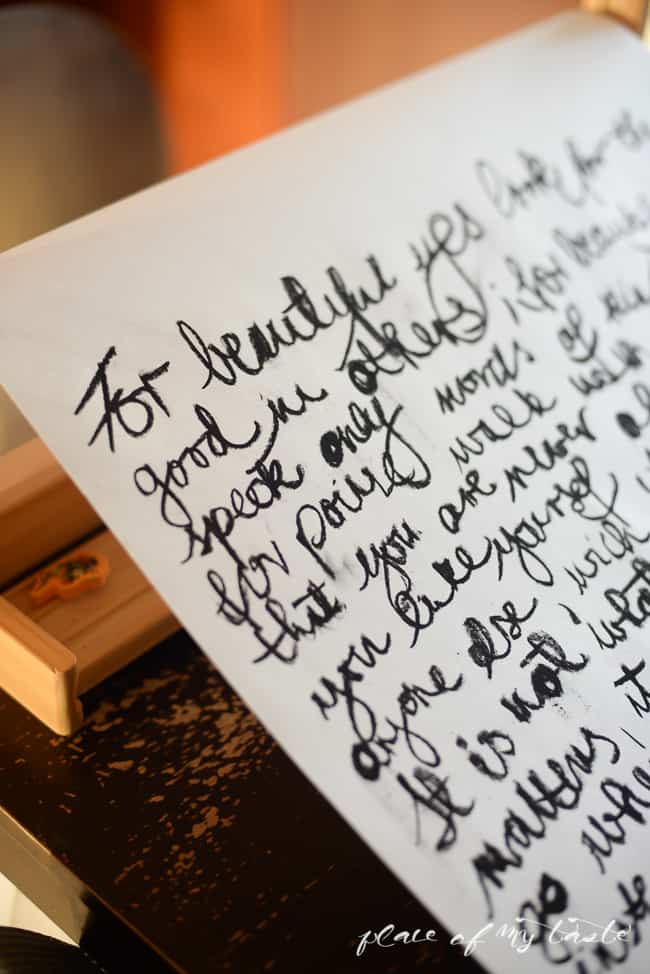
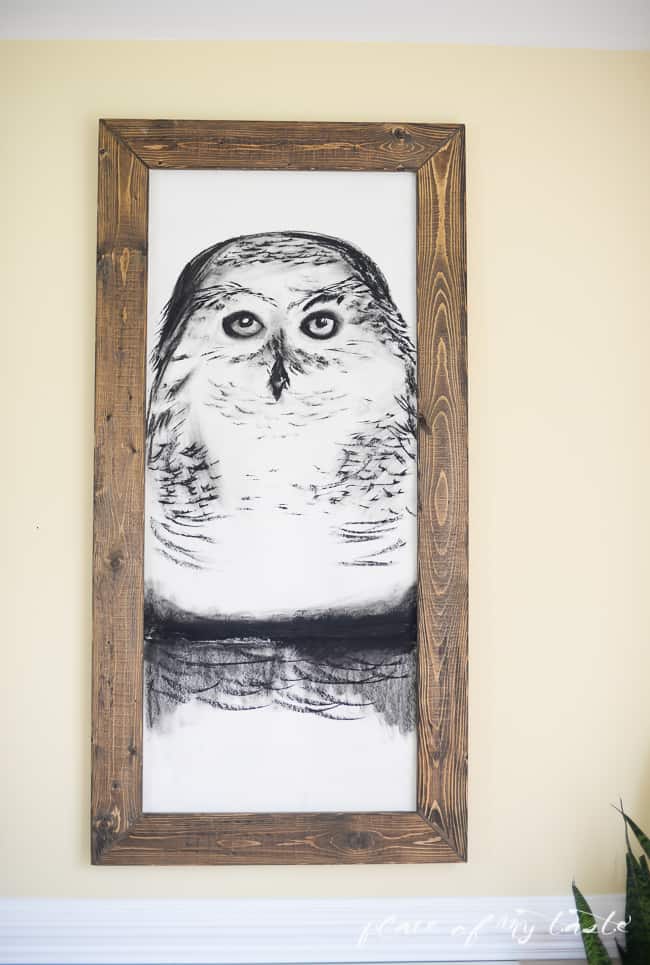
I drew my art with my pastels.

For one piece of art (I saw an inspiration at West Elm site) I just wrote inspirational life quotes continuously. Looks so fun!
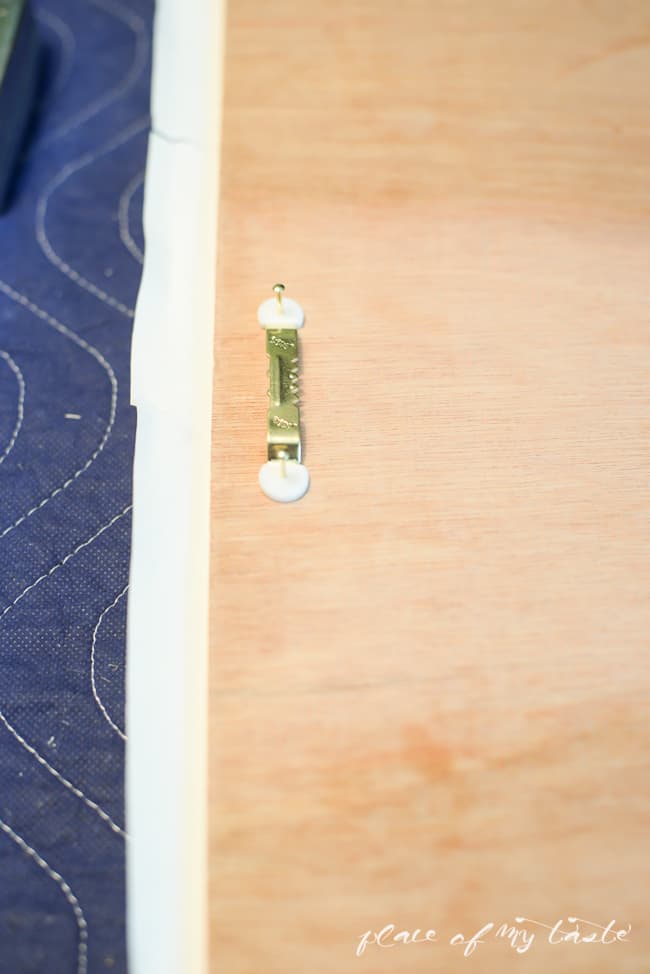
I placed my art on the top of the board and flipped the whole frame upside down to attach the board to the frame with screws.
I left the paper slightly longer than the frame, but after the screws had been screwed in, I cut off the paper that was over the frame.
As the last step, I hammered a sawtooth hanger on the back of the frame.
Tada!
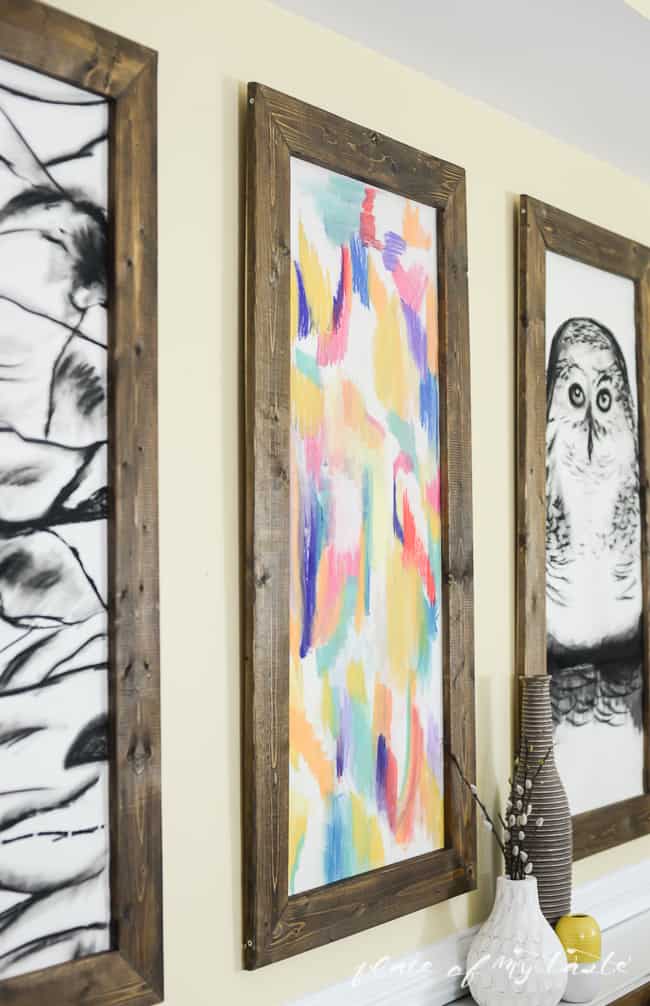
3 GIANT WALL ART FOR $30
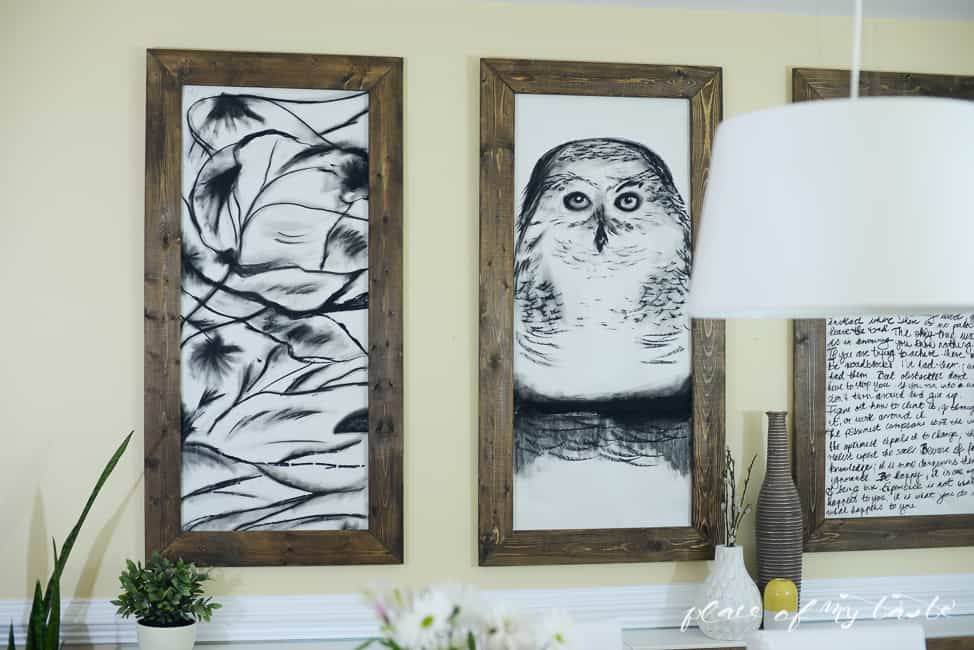
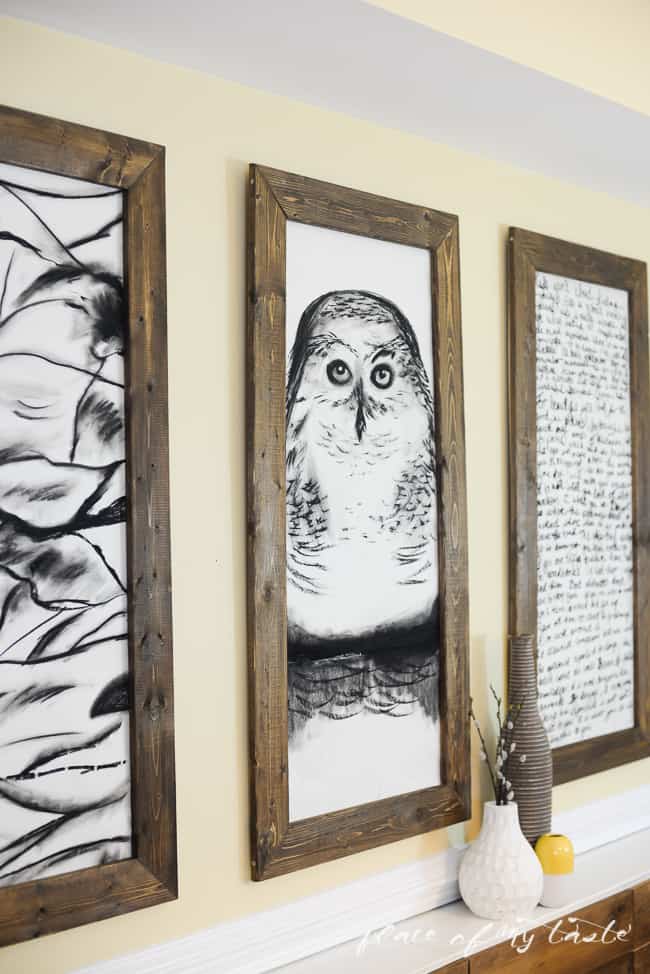
They fill up the large wall surface so well, and these HUGE frames make the room look five times bigger!
The stain turned out beautiful; the color is just amazing!
I was playing around with the drawings…first I made a colored piece in the middle, then I switched it out to all black and white.
What do you think, color in the middle or stay with the black and white only?
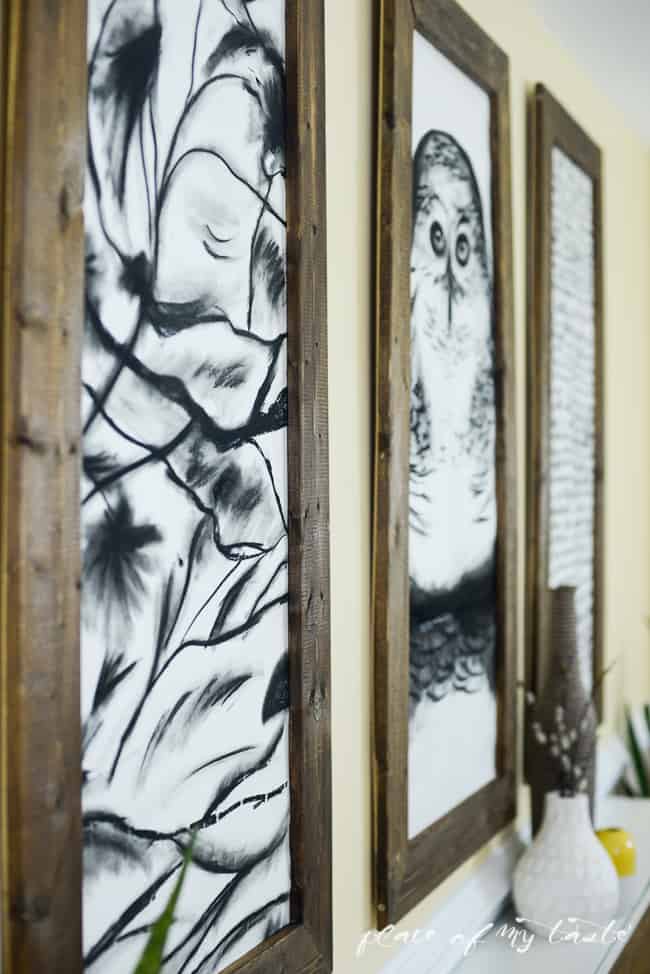
I am seriously in love with these frames. All I want to do is to sit here and stare at them!!
Update: One of my readers asked –
“What if I can not draw any art to put in these frames?
You may put fabric or other downloadable art into the frames. 🙂
There is another project we tackled in this room! I am planning on posting about it on Thursday so be sure to check back!!
Below is a peek. :-)♥
I hope you got inspired to create your wall art! It is so worth the time!
If you like this project, here is an image to pin to remember it for later.
 Come and party with us tomorrow and check back on Thursday to see the rest of this room!!
Have a lovely day!


I know this is an old post, but I’m obsessed with this project and so glad I stumbled across it!!! My husband has my frames made already, I’m just still deciding on what to put in them! I can’t find any wallpaper or fabric examples I just love, have you come across anyone using your template you could share? Or has anyone sent you pictures of how they used the frames?? I thought about adding matting for a more sophisticated look, but I’m not sure I can afford them big enough for all 3.
Thanks! <3
Hello- I am glad your husband built you the frames. Indeed, this is one of my older posts. YOu can DIY matting – here is a post from one of my friends. https://biggerthanthethreeofus.com/how-to-cut-your-own-picture-mats/ I don’t think you will find any art pieces that will fit in the frame due to it’s large scale. Again, I would add fabric or wallpaper to make it easy and cost-effective. Send me pictures once you find a solution. Best to you!
Thanks so much for your quick reply! I have found some wallpaper I’m excited about and might give it a go. The DIY matting shows board of 24×36 but I would need bigger 🙁
These are fantastic! (old post I know, just stumbled on it). What did you buy for the “project panels”…meaning what did you put the paper onto? Was this from Home Depot too?
Yes, The Home Depot for sure. I think it was underlayment.:-)
I love the black and white, but not a big fan of the writing. I would prefer to see another pictorial rendering – either another animal
(a fox or bird?) or another floral abstract.
I love what you’ve done with this room! I too would be interested in purchasing the pictures. Are you selling them?
Hello! Aniko. Amazing! work. Thanks! for share. Blessing!!
Thank so much!
Hi Aniko ???? Your work is gorgeous! I would love to purchase of this perfect trio….are they for sale? ????
https://placeofmytaste.com/wp-content/uploads/2015/01/diy-giant-wall-art2.jpg
The frame are bold art in itself! Take a bow.
Are you still planning on doing a DIY for the inspirational quotes artwork? I love it and they are so expensive to buy so I’d love to know what you used, etc as I’m not very artistic. Your talent is great!
This is BEAUTIFUL! I’ve been looking for ages now for exactly this! Unfortunately, I don’t have nearly the skill you do to create those images with black chalk! Would you ever consider converting them into printables? I would buy the images in a HEARTBEAT and get them printed. I haven’t found any printable triptychs that I like half as much as what you’ve created by hand!
I am totally inspired and amazed at your talent and your industrious efforts in this awesome, beautiful project! I really love black and white together so I vote for the black and white art as Number 1!! You are SO gifted!
Thank you for the colored piece of wall art!!!
For those of us who can only draw stick figures- me-It gives us ideas and’ permission’ to draw/paint something that doesn’t look like anything in particular!Attaching fabric to the frames is a great suggestion, too, thank you!
Polly
Those are beautiful. Can you tell me how you would change out the artwork? thanks
I’d unscrew the back panel and change the artwork. It takes only 2 minutes/each. I changed my artwork for the spring and then couple months later I pulled back what’s originally was in the frames. Totally works! Hope this helps! Have a wonderful day!
Hey there, I’d love love LOVE to buy these three paintings if you are willing to sell them to me? I’m absolutely sure they are perfect for this empty wall I have. Would you consider it?
Thanks for the possibility, in advance!
Laura
Laura, I have had a few people asked for purchasing these arts. These are so huge but I will try to photograph them and I will certainly let you know if it will be available for purchase. Thank you and have a great rest of your week!
Love your art! Your talent is awesome! I especially like the piece where you wrote all the quotes/sayings on it. I could do that one! lol. Great idea!
Wow, amazing work! I would suggest placing the coloured one in the middle but hey, that’s just my preference.
Wow Aniko, what a beautiful gift you’ve been blessed with. Your art is fabulous! I love how rustic the frames look and I think the 3 black and white pictures make the dining room. It really complements the yellow. Enjoy your room. I think it’s the best one you’ve done too.
Thank you, Pam. You are so kind!We definitely enjoy our new room:-) Have a great week!
I prefer the black and white. You are so talented and could easily sell these if you can ever fit it into your schedule. I would love 3 different horse looks and I love huge art work. It’s so easy to fill a long space and looks so fab. I’m new to your blog and loving it, so glad I found you.
So glad you found me, Debbie:-) Hope you will get some inspiration and you will stay for awhile! I did consider selling these, I might make it happen. Hope you are having a great Monday!
LOVE the black and white!! Now I’m showing my ignorance here 🙂 – what is ‘project boards’? I know it’s for the back – but where do you get it? Thanks for your blog! Love it!