DIY PALLET FURNITURE – PATIO MAKEOVER
Today I am going to show you how to build an outdoor pallet furniture. I bet you’re gonna love it!
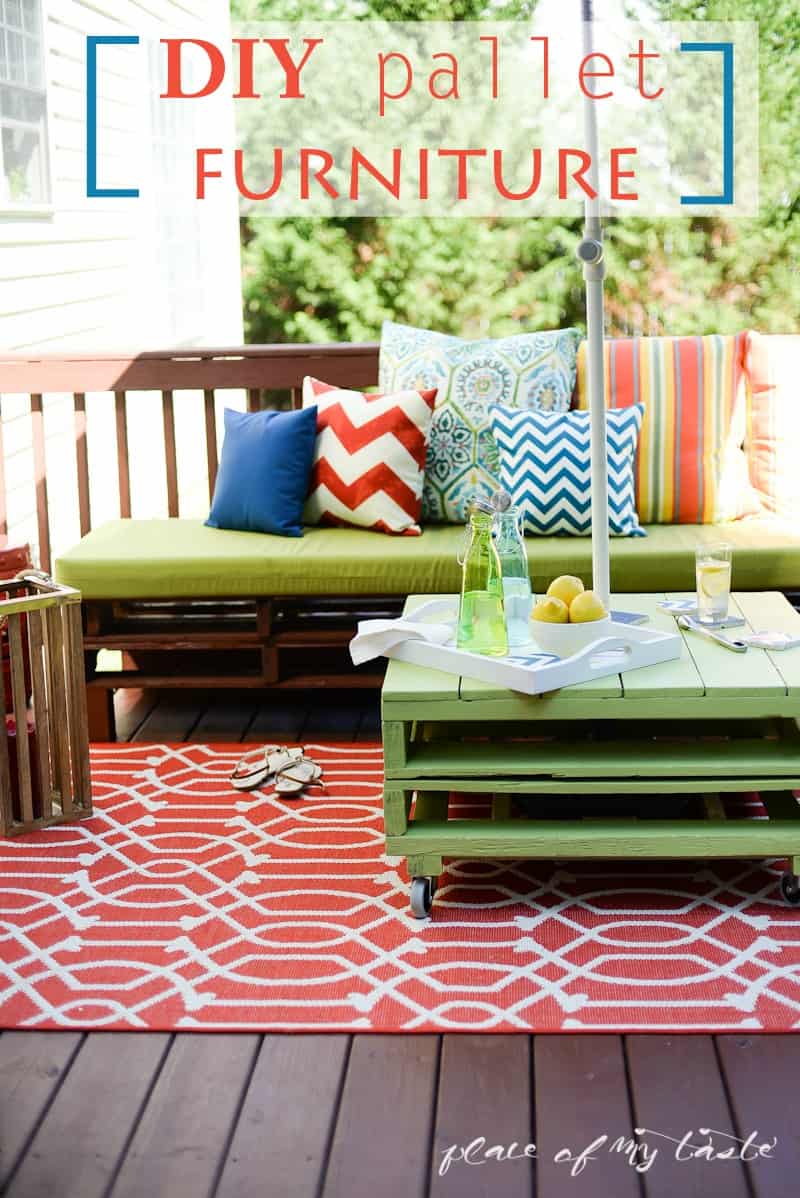
So excited about today’s post, my Friends, as I am so much in love with our new outdoor space!
The pallet furniture that we built is quite amazing. I feel like I want to spend every free moment out here! Oh my goodness!
It turned out exactly how I had envisioned it in my head!
Pallet furniture for your deck, porch or patio! So fun!
I stumbled upon a few pieces of pallet furniture on Pinterest and I totally envisioned our new, colorful, fun patio in my head.
When we moved in 6 yrs ago, we bought a nice patio set which I upholstered last year, find the tutorial HERE.
I loved that makeover very much as it was a huge transformation, but this year the cushions were ready for a change again.
Of course, I love colors and, and wanted to use lots of summery colors for this outdoor project.
I made up my mood board while I was planning the. I am not big on planning my projects usually, but this time I had to,
as the fabrics were ordered online.
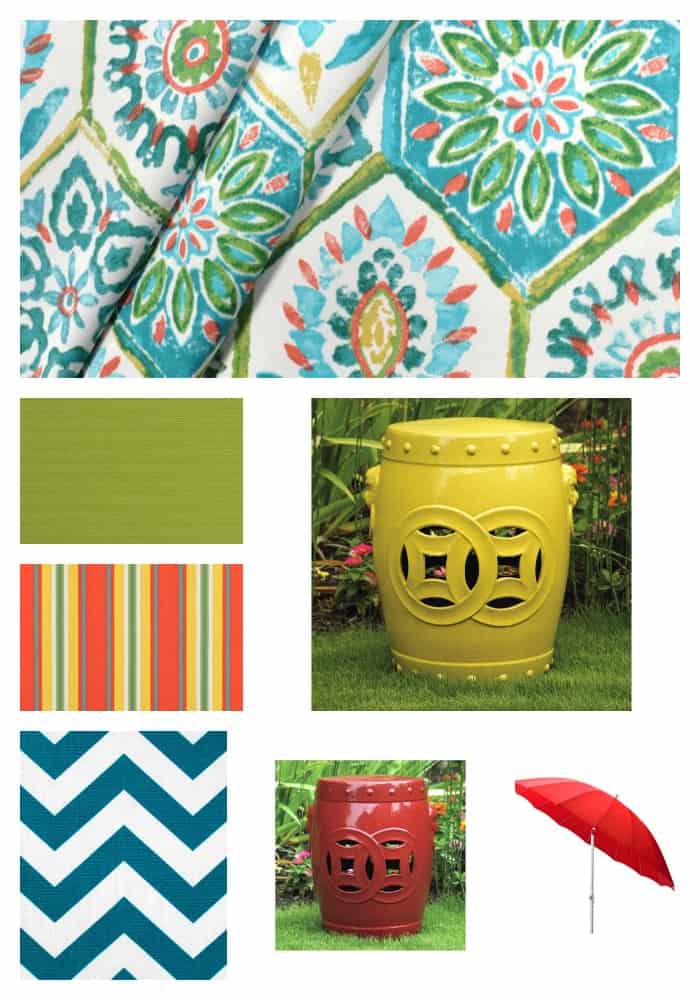
I think I definitely got the colors going, didn’t I? ♥
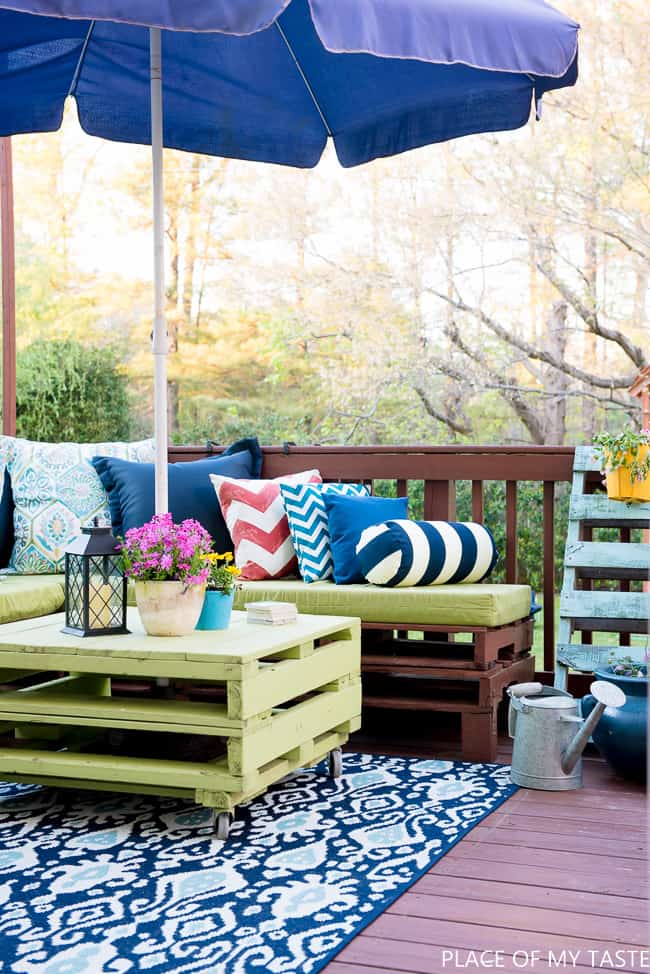
LEARN TO MAKE A PALLET PATIO FURNITURE!
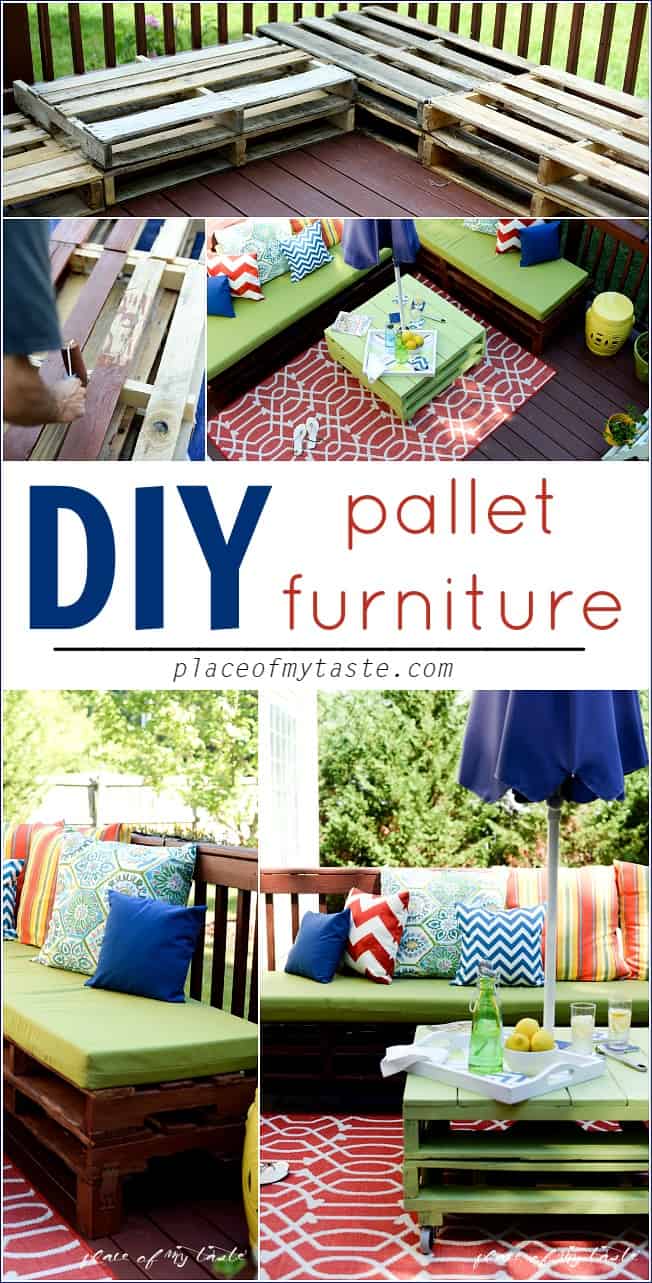
So this is what we started with:
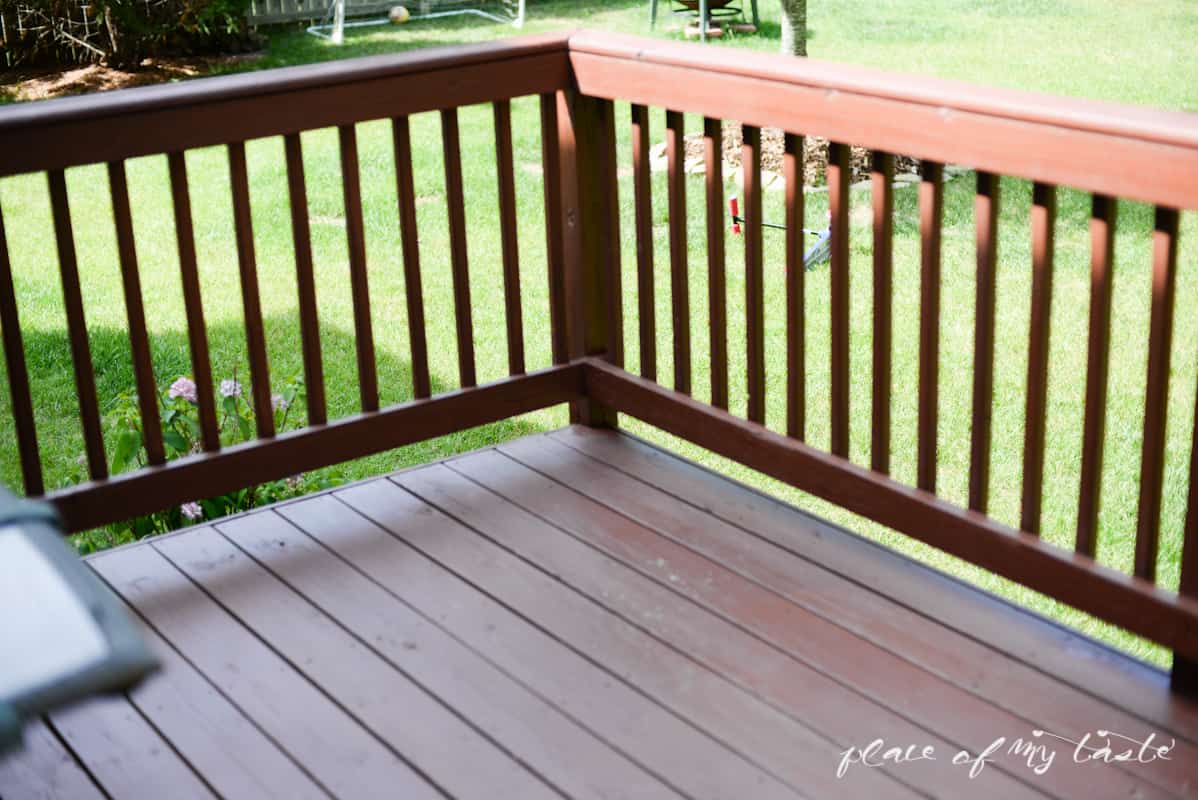
A nice empty deck.
Hubby repainted the wood to give a nice and fresh look to it.
Then we picked up some pallets that were in good shape from our business place.
We have a load of shipments each week to our business, so definitely had pallets on hand!
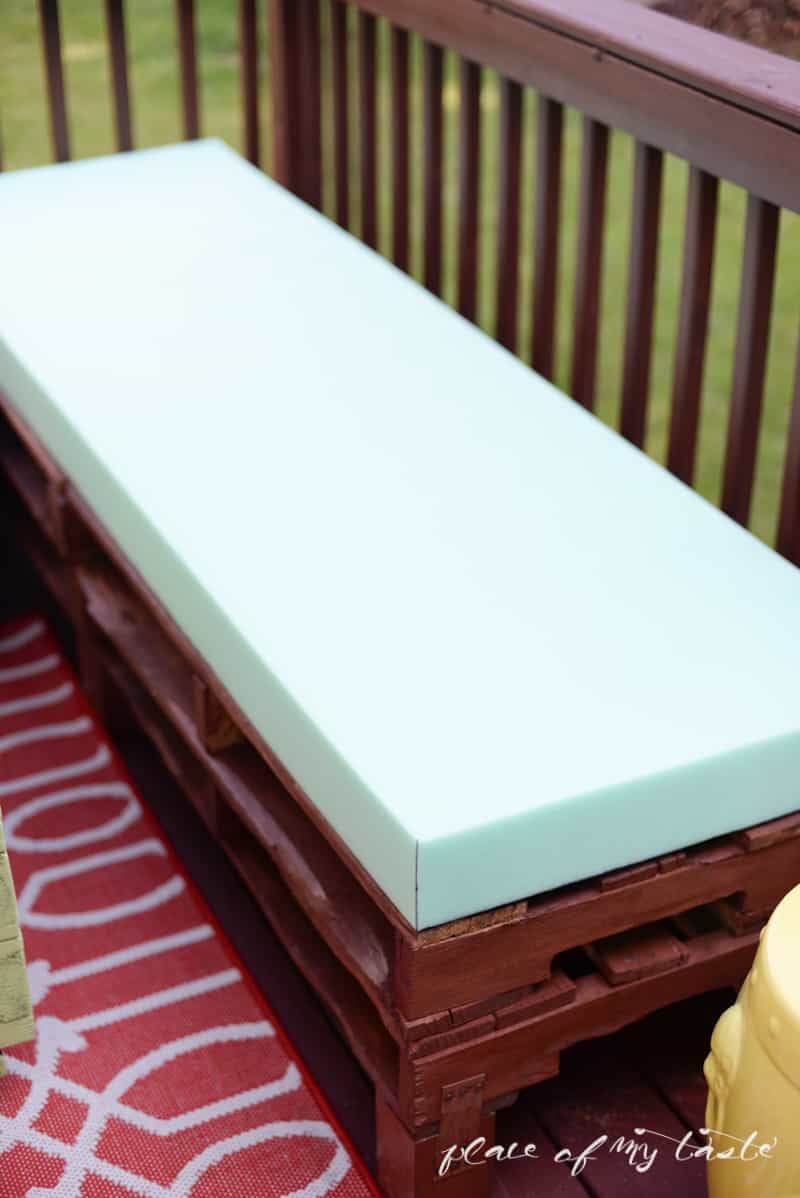
The standard pallet size was a bit wide for us. Needed to cut about half off to get the right width for the sitting furniture.
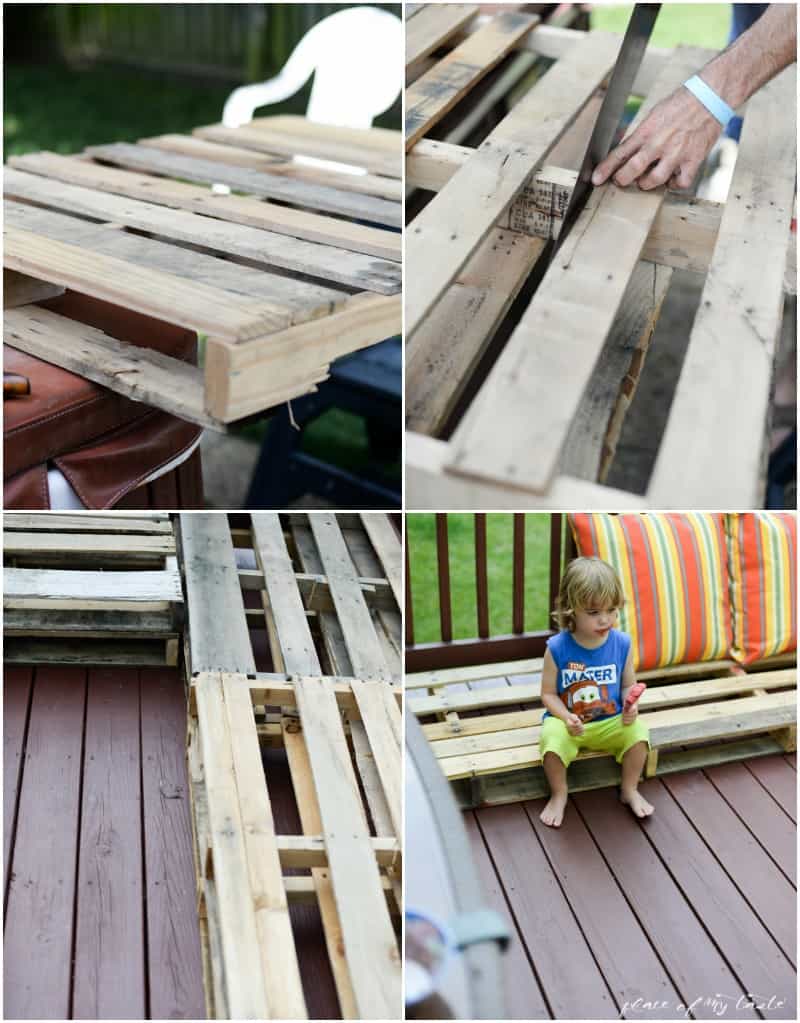
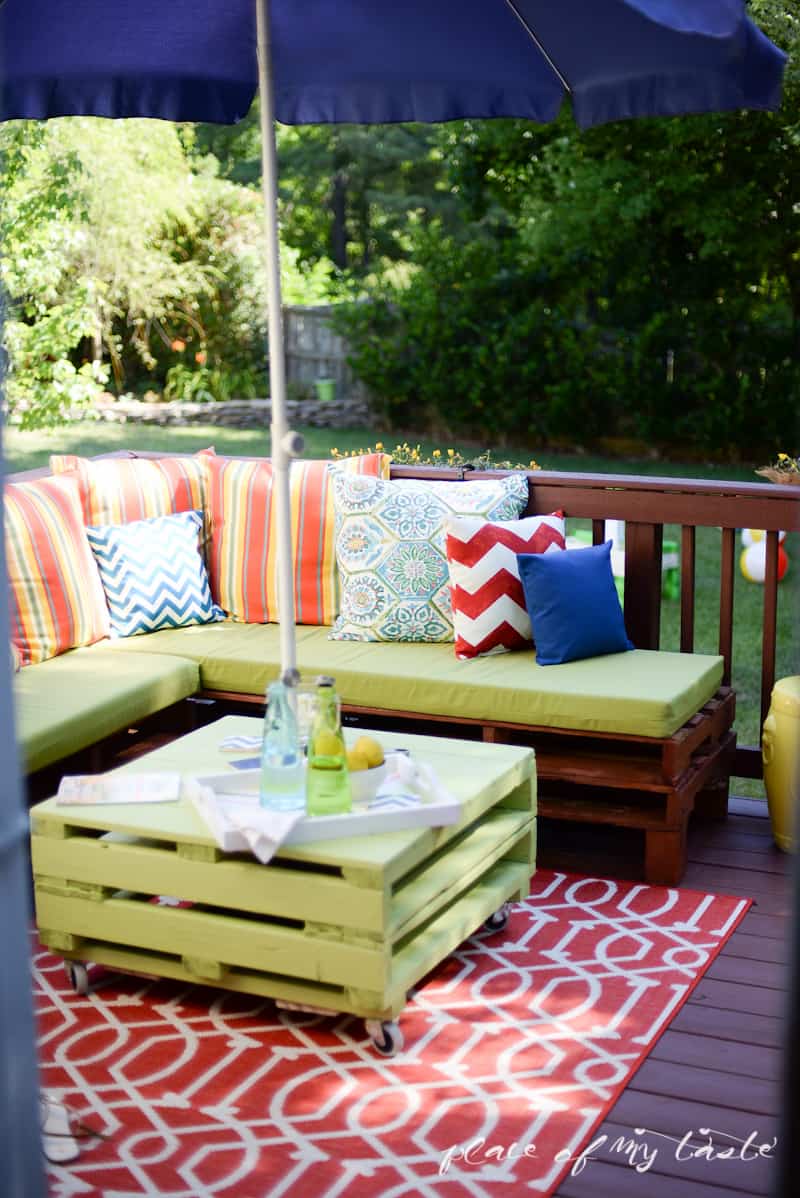
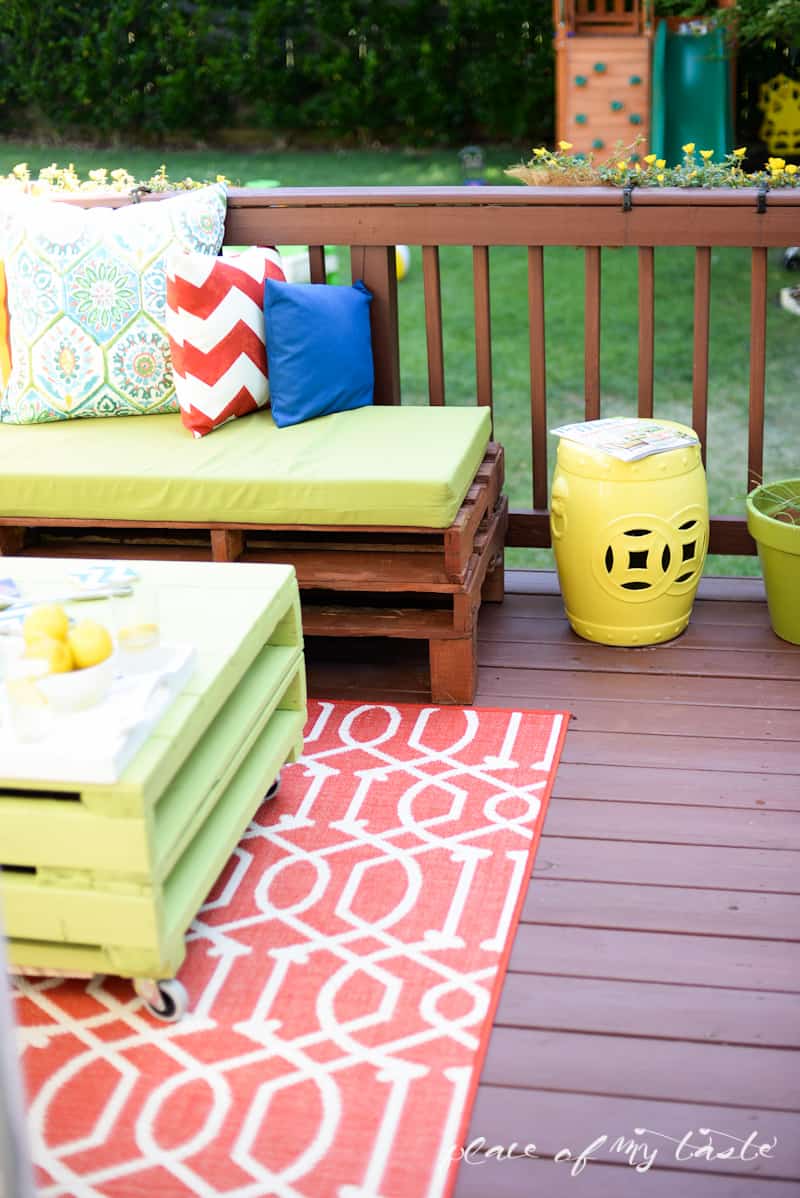
Then we placed the already cut pallets on the top of each other to make an L shape sectional in the corner of the deck.
(Little man was there helping of course. :-))
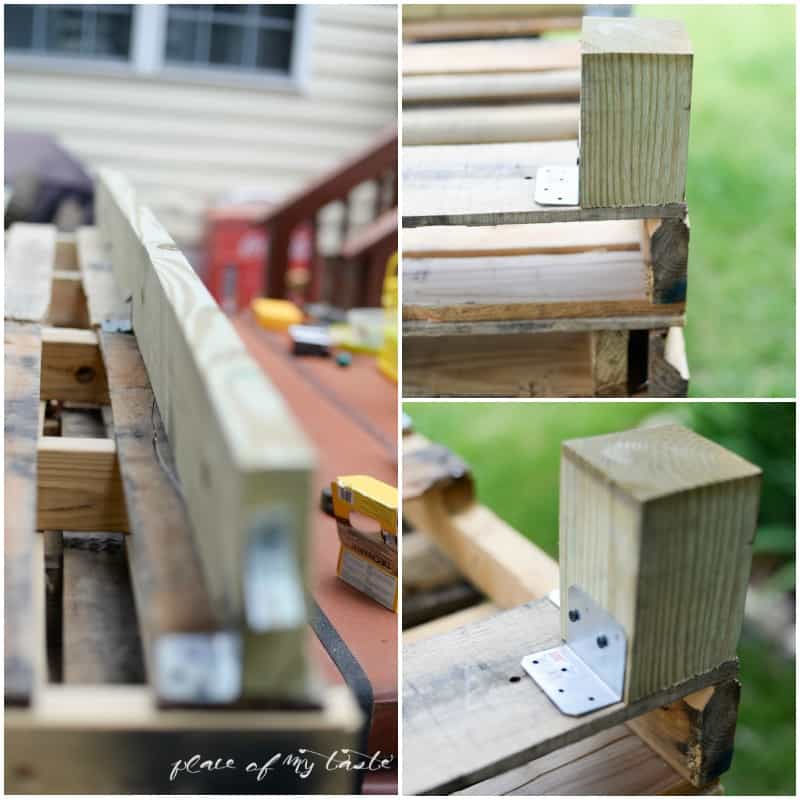
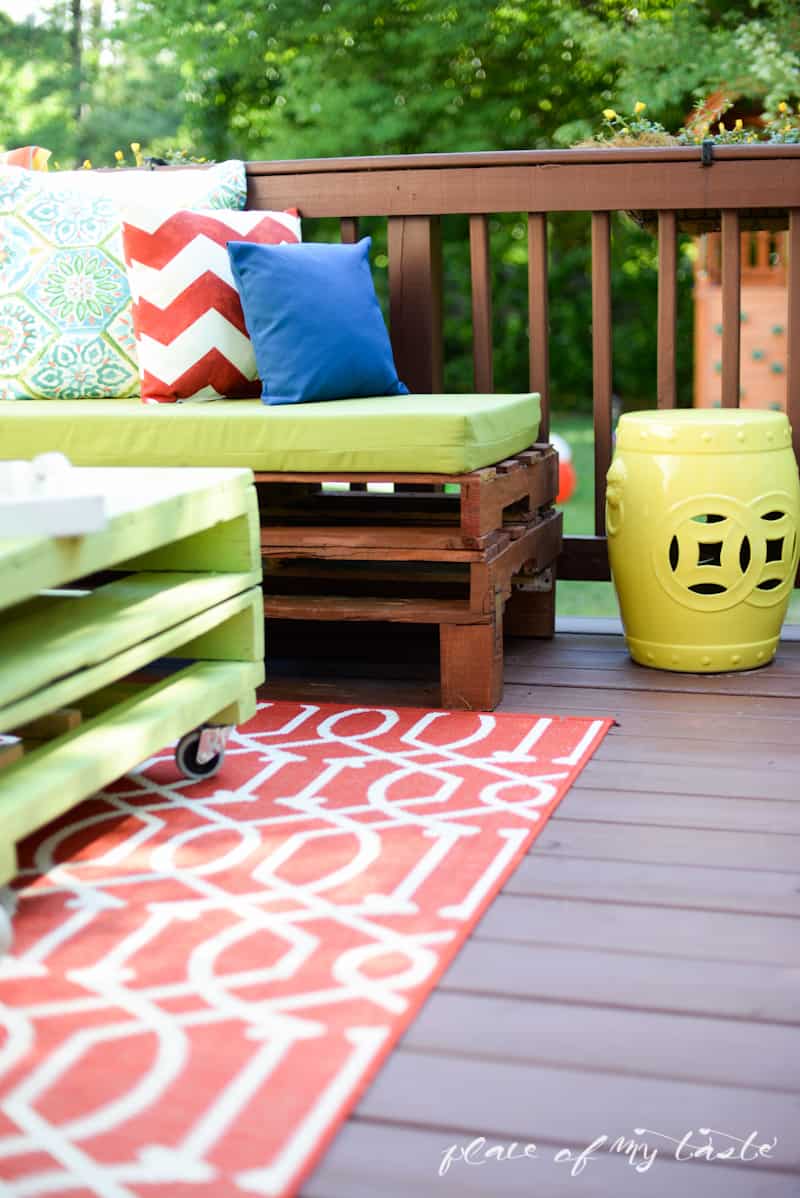
Hubby cut big thick legs for the sitting furniture from 4 x 4 wood panel, and we screwed those
to the bottom of the pallets with small tie plates. We attached a long 2×6 piece to the back of the pallet to balance out the furniture,
and used small tie plates to secure the pallets together.
So far it is not so bad, right? I have to tell you, the hardest part is over.
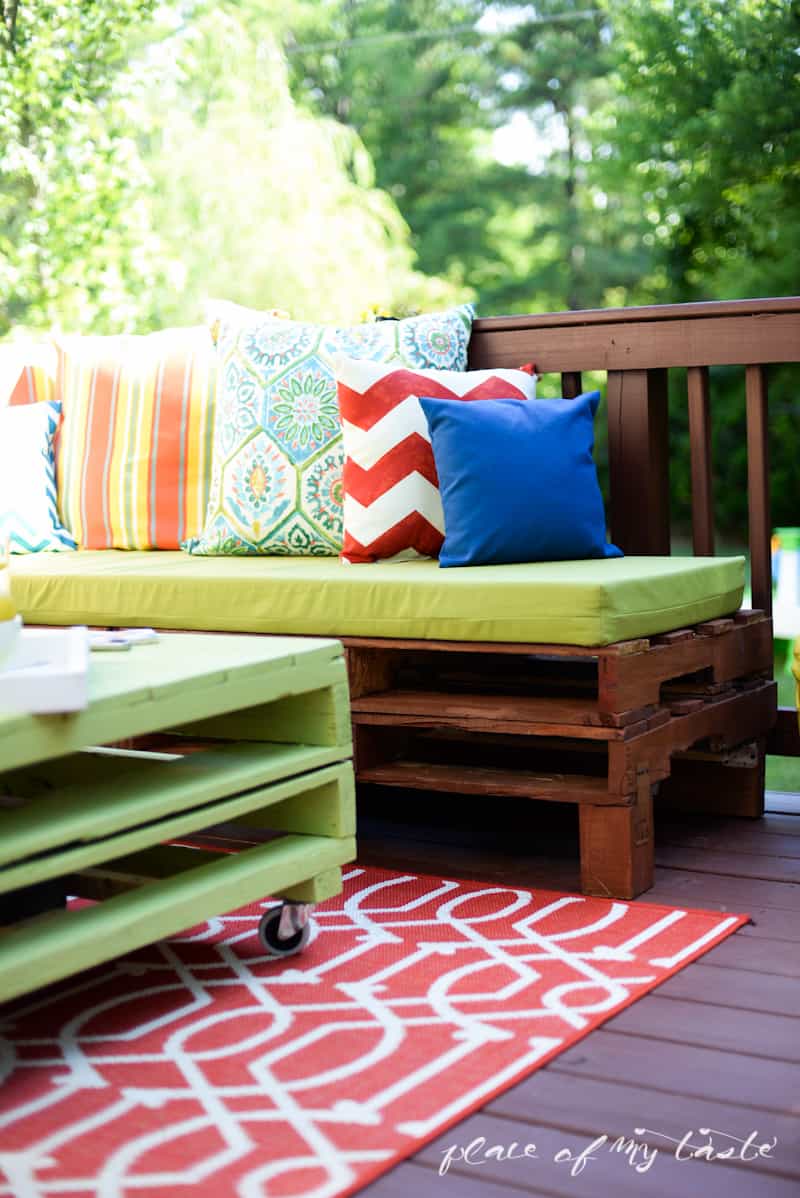
Then came a little beer time with some relaxing painting out on a sunny day. We used the same stain that we had on our deck.
I was debating if we should paint the furniture to white or some lighter color, but I am so happy that we stayed with the same matching color to the deck. It gives a nice flow together.

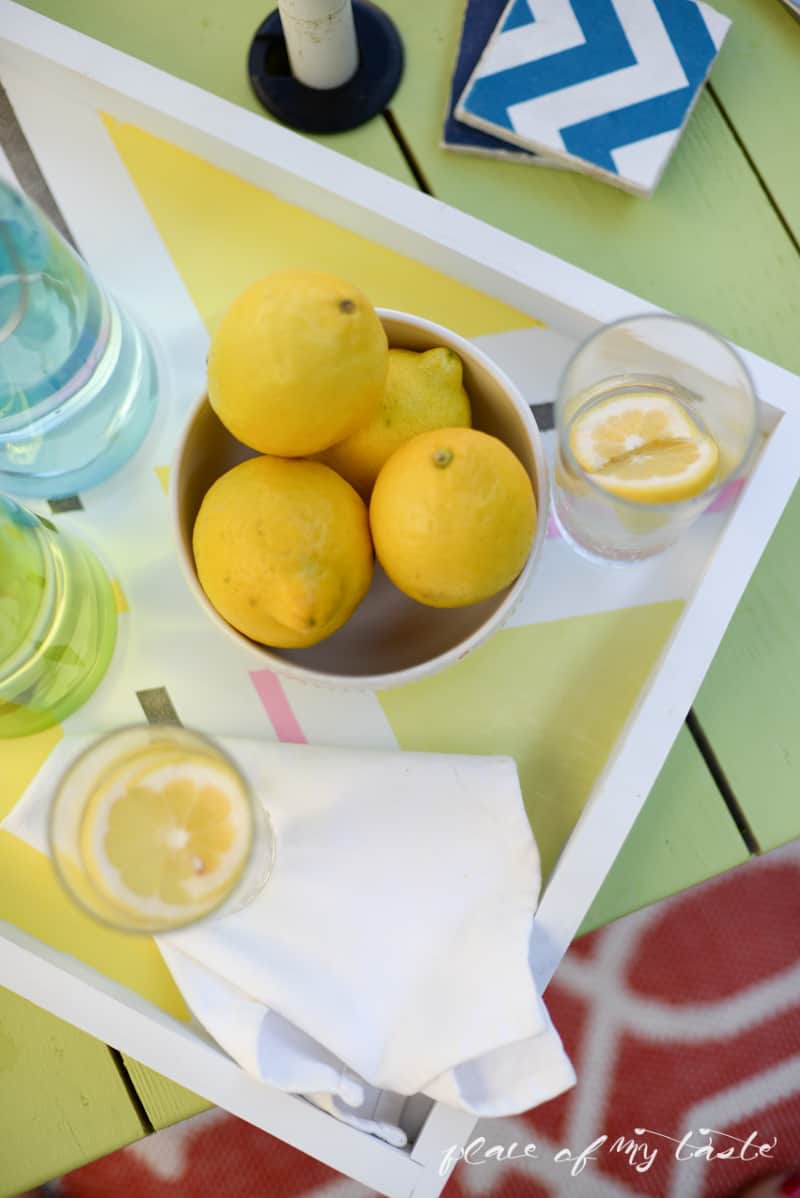
When the pallet sitting furniture was done we moved on to make the pallet table.
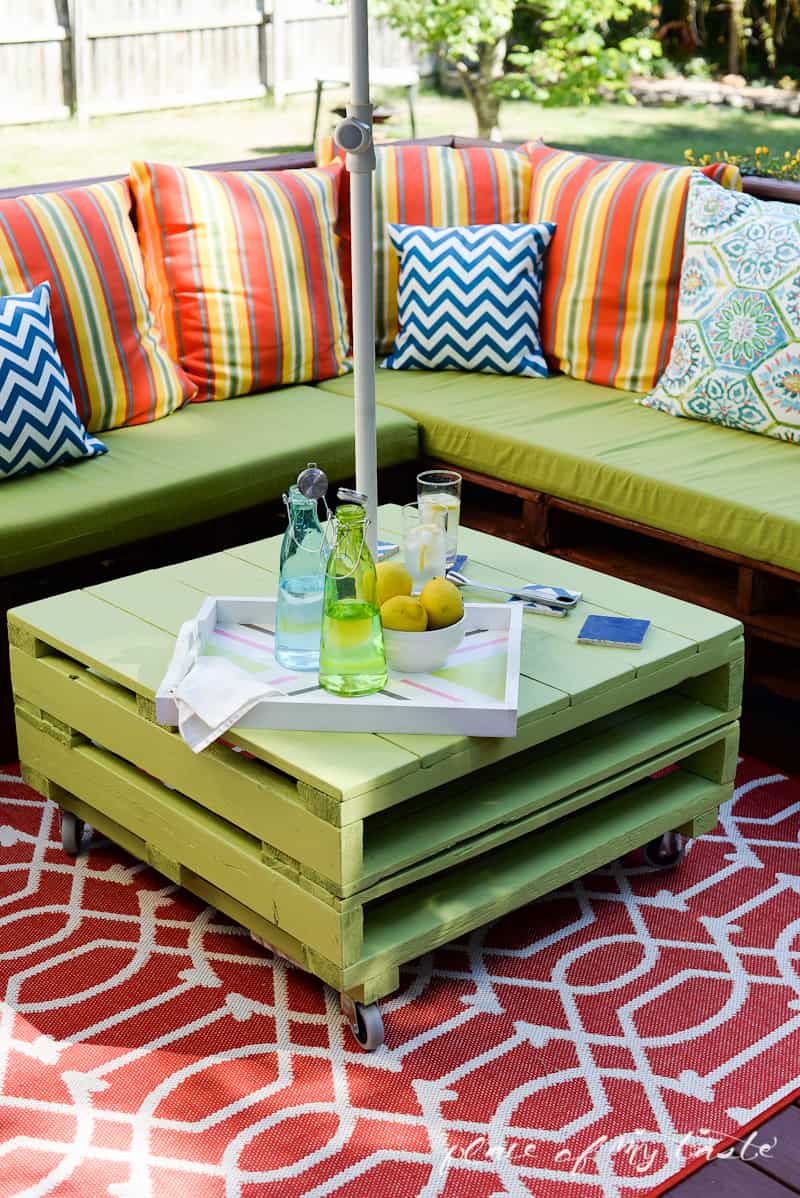
Isn’t it amazing?
The table was also made out of pallets. The pallets we used for the table was a little bit smaller as standard pallet size. We stacked 2 on each other and removed the top panels. We got some nicer, weather resistant wood panels from Home Depot to cover the top of the table.
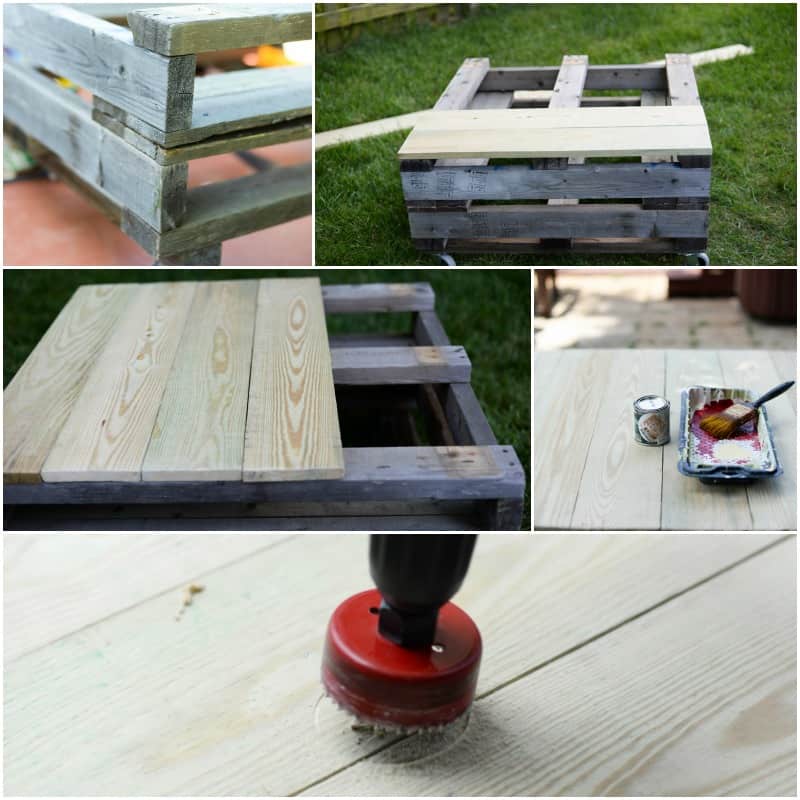
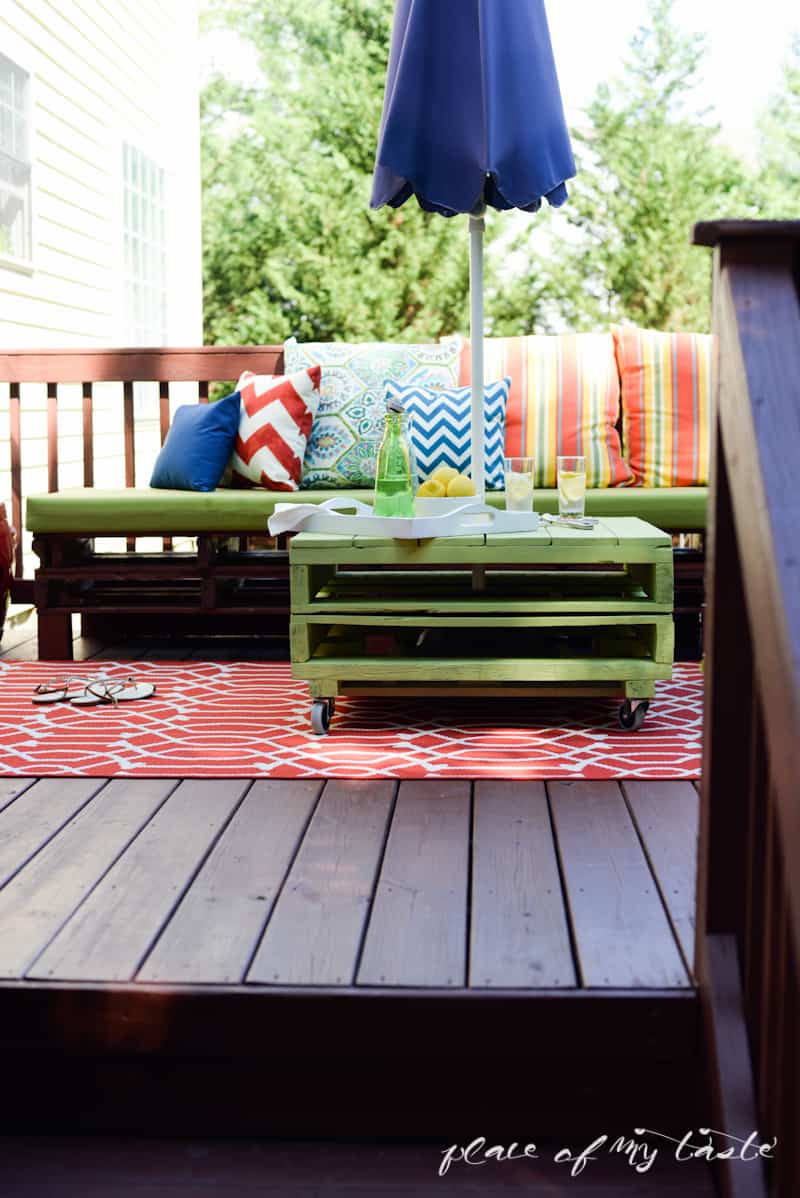
Remember that happy green from our HAPPY AND ORGANIZED GARAGE MAKEOVER? I had some of that paint left (grass cloth from Behr – weather resistant outdoor paint) so we used that to make this table pretty. I wanted to keep the umbrella, so we cut a hole in the middle of the table for the umbrella to go in there. We kept the umbrella stand (the plastic bin filled with water ) under the table (not visible).
The table also received some nice wheels so that it can be moved around easily.
Phew…That was it, my Friends! The project was completed, and we were so happy to sit down and enjoy it!
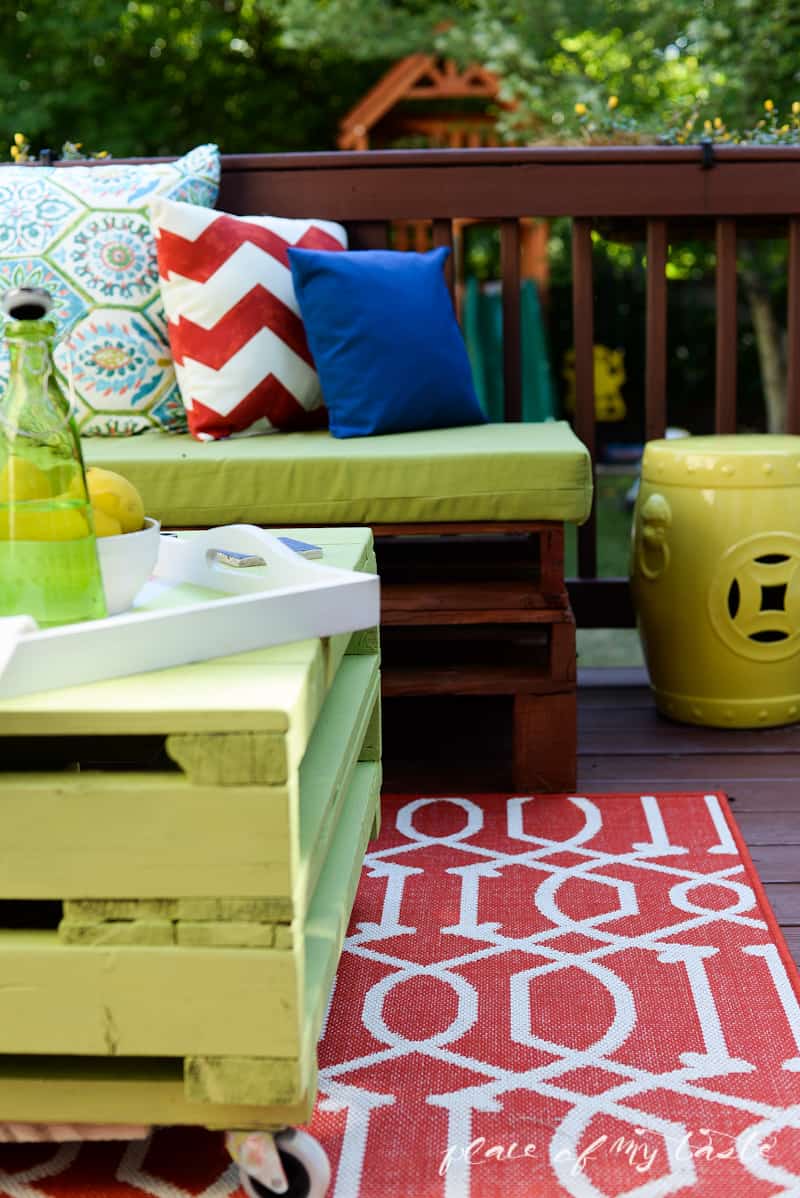
You are not going to believe, but the most expensive piece on the whole deck makeover was the foam for the sitting furniture. They sell the foam by yard, and it is pretty pricey. Over $60 per yard. I was lucky enough to find the foam for 50% off at Joann, though.
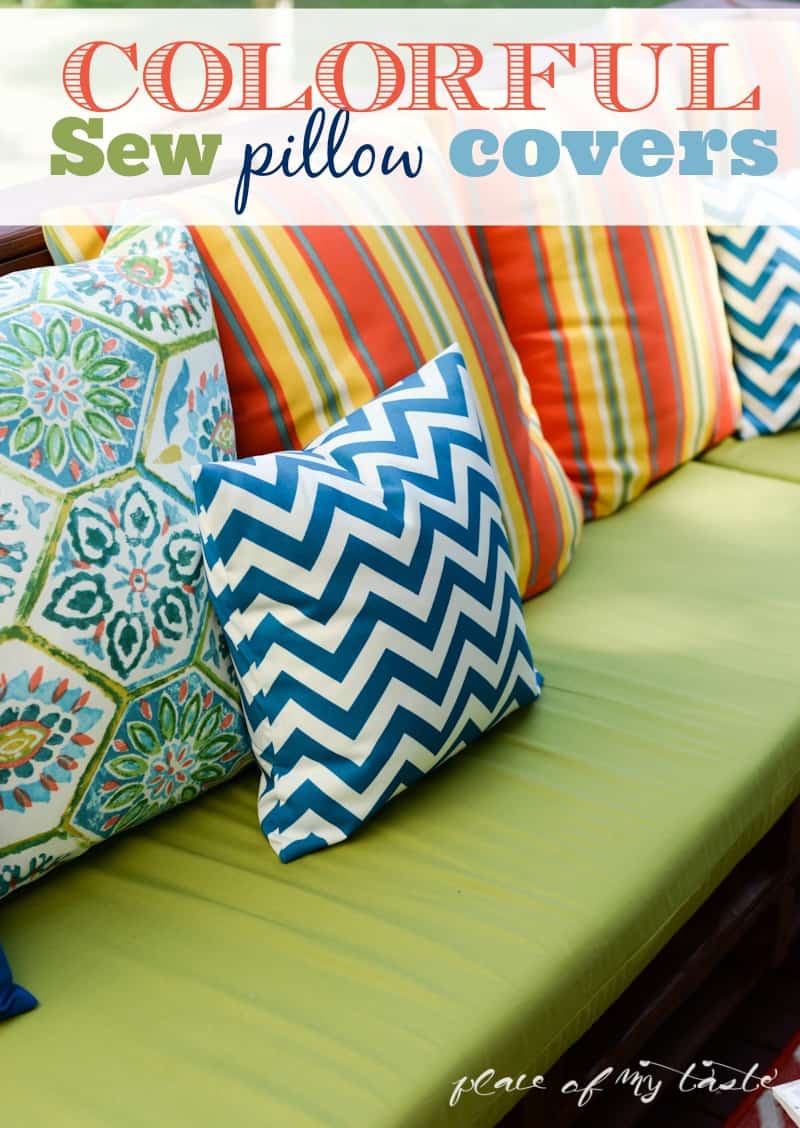
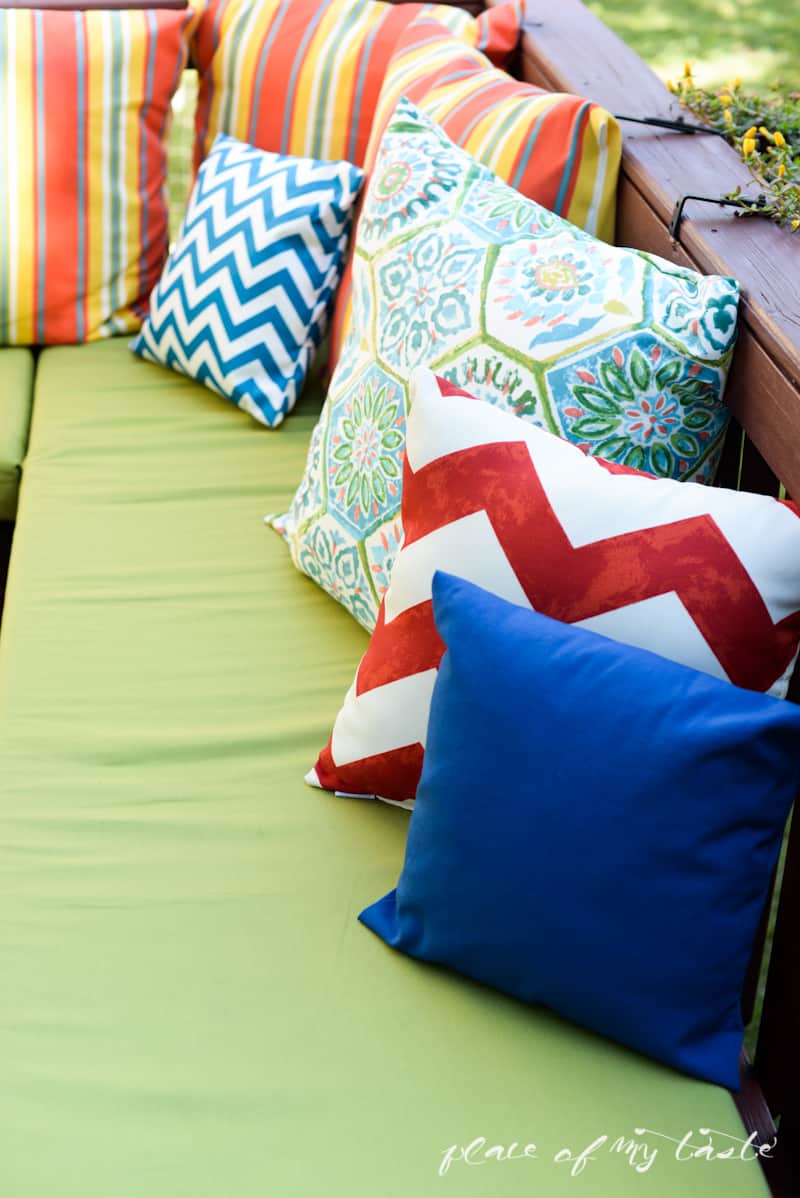
The foam was covered with outdoor fabric from OnlineFabricStore. If you missed yesterdays late post, make sure to check out the gorgeous pillow covers that we made with my Mama.
I wanted bright colors for this patio and I picked out the several different colors and patterns.
Make sure you click on THE IMAGE BELOW to enter for your chance to win a
$50 GIFT CARD FROM ONLINE FABRIC STORE
Now that the pallet furniture had been done, I was able to get going with the styling part. My favorite part of every projects.
The carpet is from Target, it was more than 50% off and the big lantern was also on sale.
My friends always tell me that I am the luckiest bargain shopper ever, I tend to find the best of the best deals.;-)
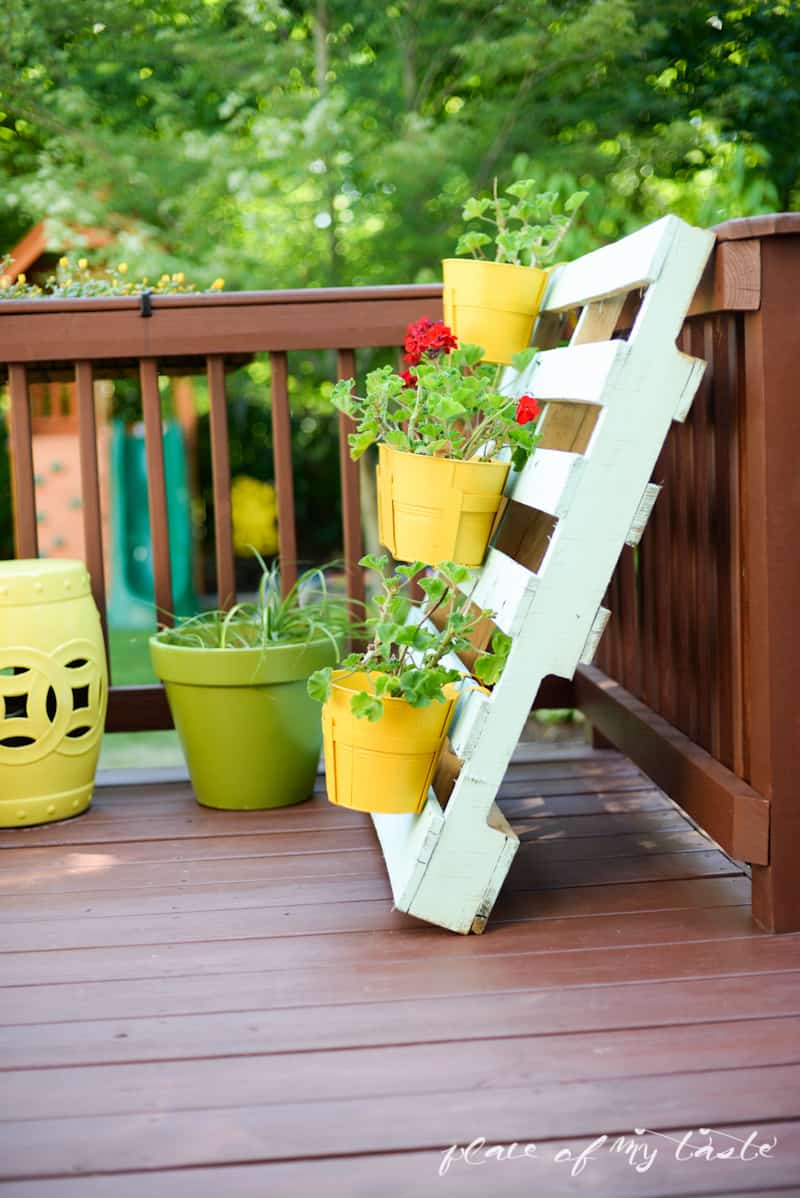
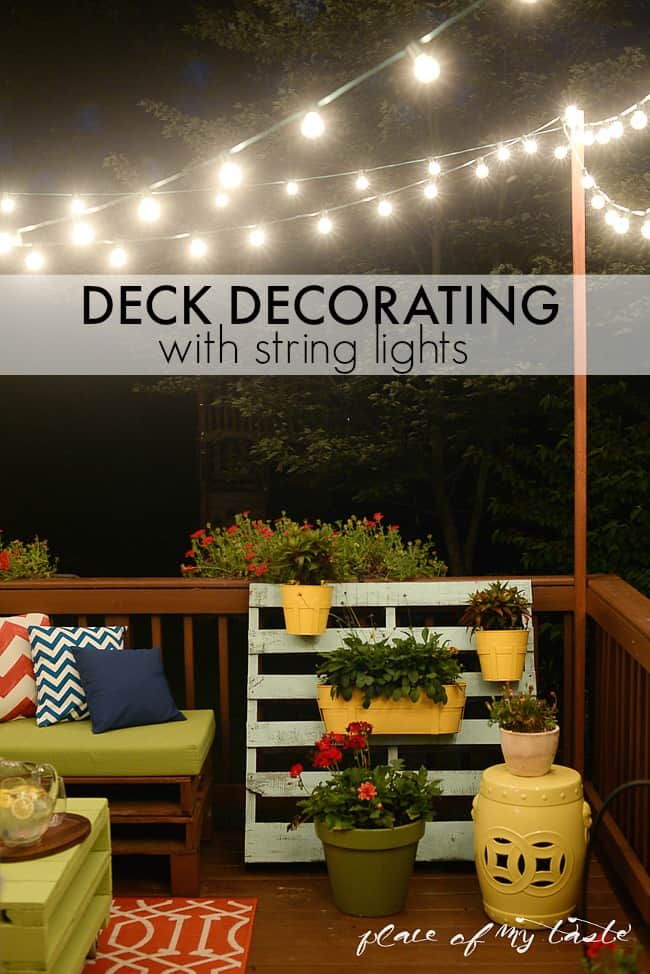
The pallet flower hanger which is leaning to the deck was also DIY-ed. Check on how we made it HERE.


Do you spot those fun coasters? I will share the tutorial on how to make those next week.!

Oh…I am loving this view. So happy that we tackled this project!

I really to hope that I inspired you to recycle some pallets and build your own outdoor furniture!
Pin this image for later to remember.
Our deck is much more spacious now compare to what it was before. I can hardly wait to get home every evening,
and sit out here with a glass of wine while the boys are running around in the back yard.
It’s happy, relaxing, inviting and it is exactly what a great outdoor space should be.
Here is the breakdown of costs:
Pallets: FREE
Paint: we already had it on hand
Fabric: To cover all the pillows and the foam : $100 ( Online Fabric Store provided me with a $50 gift card:-)
Foam: $140
Carpet: $26 (Target)
Lantern : $11 (Target)
Outdoor stool : Sam’s Club ($40/peice)
Wood panels and tie plates from Home Depot: $25
2 chevron pillows from Target: $7/piece (50% off:-))
Coasters: $2 (8pc tile from Home Depot)
Tray: $4 (from Goodwill – upcycled)
Total cost: $350
So what do you guys think? Will you start making your pallet furniture? I am so glad we did!
Thank you so much for reading today!
Xoxo
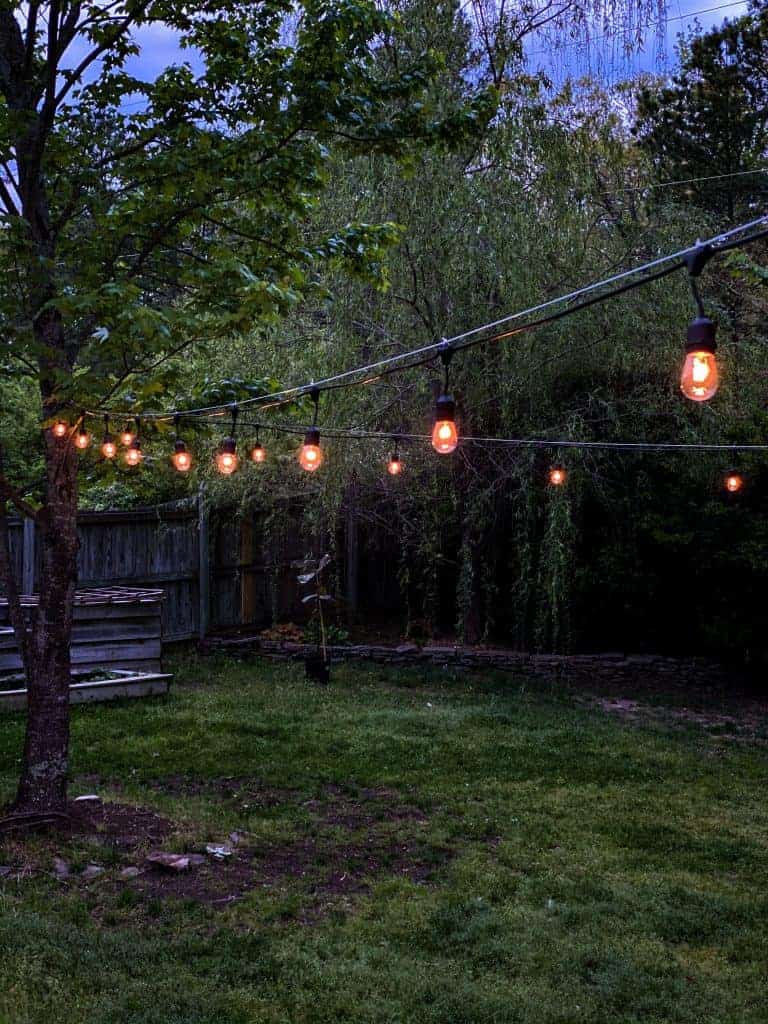
See this patio with fun STRING LIGHTS
And here you can see my PALLET PATIO REFRESH ( 2 YEARS LATER)
***UPDATE***
This project was featured in Better Homes and Gardens July issue this summer.
Absolutely humbled and honored to see this project being featured in my favorite magazine!
Read more on the behind the scenes with BHG


I always experiment with a pallets using different solutions. Last summer I created a coffee table from pallets and it looks really nice. The main reason why I am doing this, is that wood has gorgeous natural look, it has beautiful pattern and lines. I really like the texture of wood and I can show it creating furniture from it. Pallets is one of the way how to do it much more easier.
Hi Aniko
I signed up to receive updates from your blog; but have not received an e-mail confirmation at all. Can you help?
Great job. just came across your blog. Love it.
Thank you! I hope you stay for more inspiration:-)
Wow, I had no idea it was so easy to turn shipping pallets into amazing furniture! I actually have a handful of those pallets that a friend was going to throw away, so I may need to try this over the weekend. That bench would look really nice on my deck, and that planter hanger is really clever! Thanks so much for writing!
Hi there! I absolutely love LOVE what you did with your porch!! …. just wanted to give you a little (huge ) $ saving tip…….. Lowes & home Depot sell “camping pads” ( 2 inch thick foam&id estimate aprox 5&1/2 to 6 foot…. I’ve used both the expensive Joanne fabrics stuff & the Lowes camping pad & in my opinion nion they work just as well!!) ….Here’s the best part…. they cost $14.99!!! 🙂 Just wanted to pass along a great tip someone else shared with me. Good luck on all your future diy projects!!
Oh, I wish I had known! The most expensive part of the projects was the FOAM! Keep it in mind for the next one:-)
great tip. Do you know the measurements for the foam pads?
I love the outdoor pallet furniture!Where is everyone on the DIY blogs/sites getting the pallets? I went to our Home Depot once and there was a small atack of pallwts outside the garden center, but they said I couldn’t have any…?
Polly. I used our shipping pallets from our business but if you can find a pallet place near you ( where they buy pallets from businesses) you might be able to find some that they don’t use:-) Hope it helps!
We made the pallet furniture, too, and posted it on our blog at abbyandelle.com. We found the pallets at Lowe’s, and they were more than happy to load a bunch into our vehicle. Check with the store manager, of course. Their practice may vary store to store. Good luck!
I love how you make everything so right. Plus, the Apple Green color is my favorite. Well done!
Thanks so much!
Hi Aniko, we’re totally inspired and are going to try to make the furniture this month. We hope it comes out good enough to post on our blog! Thanks for the great info and the inspiration.
Glad it inspired you! Can’t wait to see yours done!! Have a great weekend!
Just saw your article in BHG and absolutely love love love your DIY deck! I have access to a ton of pallets and have the perfect deck to do this too. I am curious though where you found the plastic stopper/ring you have at the top of your pallet table that the umbrella goes thru? Thanks for the inspiration!!
Missie- Thank you for your kind words! Love to hear that I inspire others 🙂 That plastic stopper was bought at Home Depot. Wish I could say what they call it -ha. Check the isle where you can find Electrician products. I think that is where we got it.Good luck! Send me pics of your project!!
Love it!
Would you have any ideas on putting a back on the seating, I don’t have railing deck or wall to lean on
Hello there, I would probably attach another piace of pallet to the bottom part.I would cut the pallet half and would screw them together in 90 degree angle. Hope this helps! We love our outdoor area, good luck making yours! Send me a pic once done:-)Have a great week!
I love this – of course! Thanks for sharing it at the Outdoor Extravaganza link party- I’m featuring it tomorrow on my blog and this weekend on FB.
Love it! So fun and fresh and looks comfortable too. Great job!
May I ask how your umbrella is stabilized in your pallet table? It doesn’t look like it goes through to the deck. Thanks!
Joy, sorry for the delayed response. The umbrella sits in its umbrella base. the base is hidden under the table ( there was 2 pieces of wood that was cut out from the bottom of the table so the base could fit in. Hope this helps! Have a great week!
Looks very pretty.Last time when I checked in Joann’s for making a bench seat using foam, they mentioned that whenever I decide to dispose of the foam, it has to be handled like hazmat else it will deplete the ozone layer. Are you aware of this? After hearing this I backed out on the idea but still looking for some options.
This whole area is just beautiful! Great job!!
My favorite DIY project to date and we love it so much:-) Thanks for visiting!
How thick is the foam you used?
I love this idea and its super cute! I’m a college student looks for a stylish new couch with out breaking the bank.
4 INCH thick:-) Have fun with the making. Have a great week!
I really want to try this project. I’m a single mom….money is always tight for me!! Can you tell me what sized pallets you started with? I have 2 so far but think they may be too big… Thanks so much BTW!! you and your husband did an awesome job!! 🙂
Also, can you direct me to the best places to find the euro type pallet??
Pobre Raúl, falleció sin poder ver a la justicia ni al colegio rer.iconaacY porqué no hay respuesta de los dos compañeros a los que menciona. ¿QuereÃs nombres y apellidos?En honor de Raúl me permito hoy llamarles cobardes.
Hi Kim! Sorry for responding only now, I was away fro a few days. Pallet size was 46 x 40. We cut a little off of it as it was too wide for our patio in its original size. The size we cut it to: 40″ x 25″ each pallet. I wish I could tell you where to find these pallets. If you were local I would gladly give you some for free as we have a Lot! Maybe try to Google pallet place in your area. There are always places who buy and sell pallets. Hope it helps! Let me know if you have any questions!Good day!
This is so amazing! I just featured this in my Favorite on Fridays post at my blog…AWESOME AWESOME!
Thank you so much for the feature.Xo