EASY DIY WINE RACK
Today I will show you how I made this FUN DIY wine rack which I thought would be an easy project ( hence the title!), but I ended up spending more time with it then I thought I would. Oh well. :-))
Jen from The House of Wood invited a bunch of woodworking gals to join her in an organizing building challenge. Okay. I am not a REAL woodworker GAL, but I thought I would challenge myself. Why not, right? I can build easy things like this DIY PICTURE FRAME or this DIY TV STAND and I got excited about an organizing project as I have way too many things to get organized around the house. So I signed up to build an excellent solution for my messy wine bottle situation in my dining room corner.
I love a good glass of wine ( I DO!), and I always have more than 1-2 bottles at home. Wait! It does not mean I drink a bottle a day but I like to have a variety.
The ideal storage for my bottles has been nothing special but simply put on the top of my messy bar cart. Traditionally, bottles have been stored on their sides in order to keep the liquid up against the cork, which theoretically should keep the cork from drying out. So I got excited to build a great solution to store and organize my wine bottles the right way.

Ok. Let’s get into details on how I made this DIY WINE RACK!!
MATERIALS:
- plywood – (I used a 4×4′, 1/2″ board for my entire project )
- 1 pine dowel for legs ( cut into 4 pieces)
- 4 leg plates
- stain ( color of your choice)
- wood screw
- hanger bolts for the legs
TOOLS
- Table saw
- Drill
- hole saw
STEPS T TO MAKE THE DIY WINE RACK
I designed the wine rack to fit in my dining room corner. The size I used was 24x12x18. Before you start the project be sure to decide the size of your box.
STEP 1 CUT THE board
Measure the panels and to cut it in half lengthways then in half widthways. Keep three pieces as the top, base, and the inside (the board with holes) of the box.
TIP Use a circular saw or table saw, but if you’re not confident have the panel cut at a hardware store. That’s what I did. 🙂

STEP 2 MEASURE the grid FOR THE HOLES

I planned out 9 holes, 3 sideways, and 4 lengthways. Depending on the size of your board, the measurements will differ. Just be sure to measure precisely so the holes will look nice and even.
Tip: To make it easier I clamped the two panels ( the panels for the holes!) together and I drilled a pilot hole on both boards to save time with measuring the grid twice.
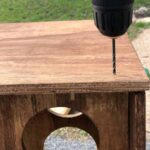
STEP 3 CUT THE HOLES

I drilled pilot holes, then used a 4″ hole saw to cut out the holes.
Then I gave a quick sand over the holes.
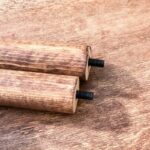
STEP 4 CUT THE DOWEL (for the legs)
I then cut the dowel to size (my cut was 8,” but now I wish I had cut it to 6″ ish.)
I screw a hole into the legs then I installed the stud.
STEP 5 STAIN
I stained my boards before I assembled my box. I just thought it would be easier to stain before the box is put together.


And I even did a little design job on the front. Ehhh. I could have a better job, but I was short on time.:-)
STEP 6 ASSEMBLE THE BOX
Put together your box. I carefully positioned the base and sides together and drilled a pilot hole then used a screw to attach. I added the leg plates and installed the dowel legs.

Once my box was put together I pushed the boards with the holes inside the box.f My boards were so tight that I didn’t have to secure it within the frame, but you certainly can add a few screws from the top or from the side to make sure your panel is secured.

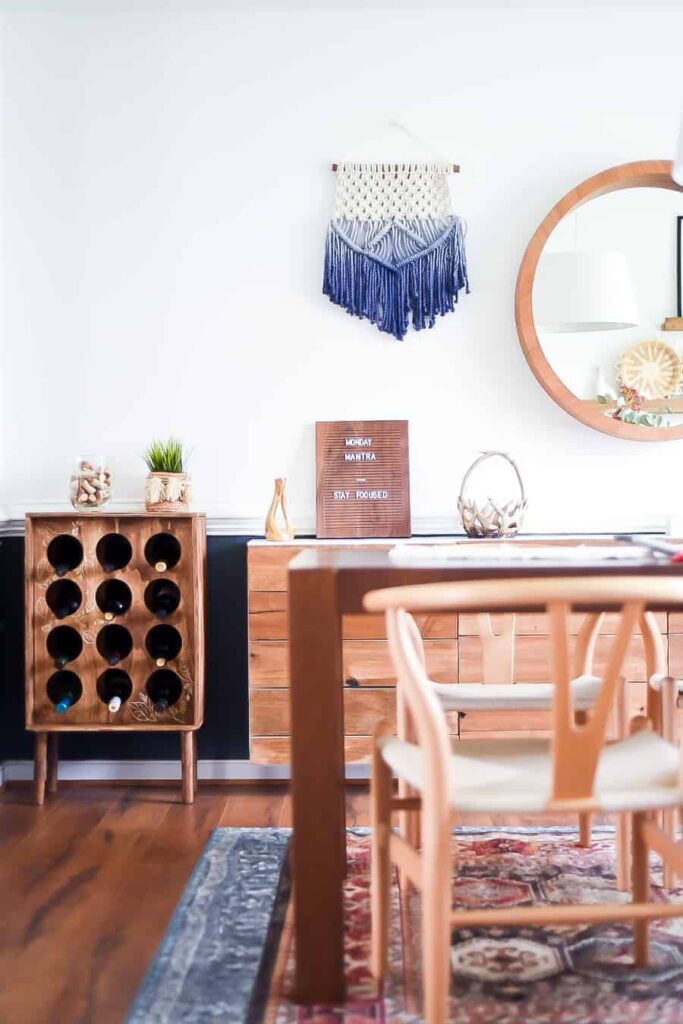
Now my bottles are organized and this wine rack ddefinitely matches my style.
Well.
I think this project turned out super good.
But!!!
I decided to make another one with perhaps 3/4 plywood next time. So if you are planning to try this project, I would maybe go with a thicker piece of wood.
Let me know what you think and be sure to check out these fantastic woodworkers organizing projects below.
- The House of Wood
- House Becoming Home – DIY Closet Organization
- Anika’s DIY Life – DIY Corner Vegetable Storage Bin
- 100 Things 2 Do – Small Parts Bins
- Addicted 2 DIY – French Cleat Wall Organizer
- Remodelando La Casa
- Jaime Costiglio – Easy Closet Shelves
- The Created Home – Shoe Storage Cabinet with Trays
- Woodshop Diaries – DIY Closet Cabinets
- The Inspired Workshop – Ziploc Bag Organizer
- Her Toolbelt – Backpack Storage Bench
- Reality Daydream – Cleaning Closet Organization
- My Love 2 Create – Between the Studs Workshop Organization
- My Repurposed Life – Between the Studs Broom Closet
- Ugly Duckling House – DIY Jewelry Organizer
- Hazel and Gold Designs – Bathroom Drawer Organizer
- Place Of My Taste – Easy DIY Wine Rack
- Joyful Derivatives – DIY Spice Rack
Thanks for checking in!
Cheers-Aniko

Hi, did you actually build it on your own? I think is amazing!
Yes, Jacob.:-) I think it turned out pretty neat! Thanks for visiting!
I love this! The holes in the front is so creative and looks really stylish. This is going on my to-do list!
Oh my gosh!! This is such a smart idea and so so gorgeous! I absolutely love the look!
So pretty and functional. I love how the stain plywood ties in with the other wood tones in your dining room.
This is amazing! You’re definitely a woodworker. Love the style of this and I’m wishing I had a good space to put one. 😉
Oh Sheri, Thank you!:-) There is definitely room for improvement, though haha! Xo
how cute! I love the art on the front, it really makes the project. The white on the dark stain is fabulous!
pinning!
gail
Thank you, Gail! I wish I had more time to play more with the Dremel carving tool. But I agree, the design makes the whole thing more unique.:-)
Get out of here! You ARE a woodworking gal! Love your wine rack – so pretty and so YOU! Haha. Thanks for joining in on the fun, Aniko!
Haha! I just wanna be you when I grow up!!:-) Thanks for having me! It was fun! Xoxo
Aniko, this is pure unique genius! I love the modern vibe, it’s all around gorgeous!
Cara- Thank you! I think it definitely matches my style. And those bottles are so chic looking in their comfy space now!:-)Xo