DIY PLYWOOD PEGBOARD WALL
This post is sponsored by BEHR®; all opinions are 100% on my own.
If you LOVE unique walls with lots of character you can also check out my DIY BLACK SHIPLAP WALL UNDER $50 and don’t miss CREATING A DRAMATIC WALL WITH CONTEMPO TRELLIS WALL STENCIL. I really enjoy finding super cool ways to add style to my walls. I’ve also been working on a tutorial to go with this B’s IKEA BIG BOY ROOM REVEAL where I created a sort of industrial loft look with aged faux brick panels! So, stay tuned and make sure to sign up for my newsletter to get the details when I roll out that!
Who wants to make this OVERSIZED PEGBOARD?!

Today is reveal day, my friends. I was excited to join BEHR for their #BEHRbox Challenge this year. I love challenges, and this one was a fun one.
A couple weeks ago I was sent a large box of items and three fantastic paint color samples. My job was to come up with something awesome and showcase BEHR’s 2018 colors. If you missed seeing the “What’s in my #BEHRbox“ post you can check it out here.

I had lots of goodies in my box, and I was inspired right away. I didn’t just want to build something, I wanted to create something that we desperately needed. My little man’s room was lacking a study area. He is in first grade, so now he needs to sit at the desk for a good 10 minutes every day and practice his writing skills. This was perfect opportunity to make an awesome study area for him that would also work as a shelving unit. I envisioned a large wall in my head (the entire surface of one of the walls in the room), using big plywood pegboard sheets. I kept seeing a sort of plywood pegboard idea on Pinterest, and I was itching to try it myself.
So here is the wall BEFORE the DIY pegboard organizer:
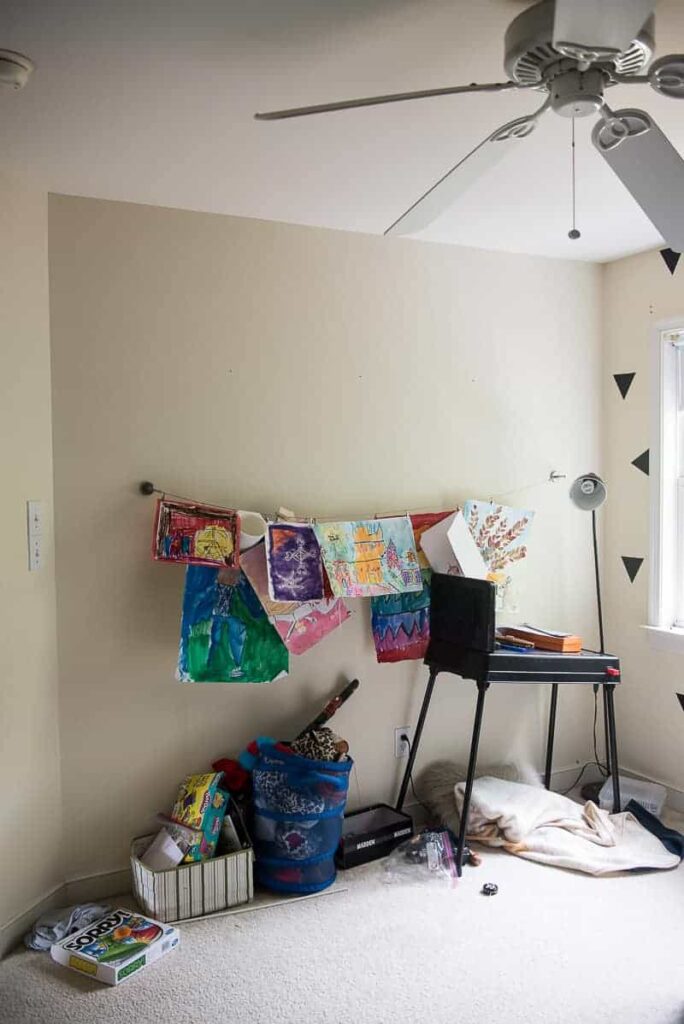
Yes! This wall needed some love for sure. 🙂 And yes, this is how the boy’s room looks like when there is playing going on in there.
The project was easy to tackle, and in my opinion, it turned out fantastic.
Are you ready to make this simple but super fun project? Let’s do it!
Materials for the Giant Pegboard project:
- 2 – 4×8 sheet of 3/4″ plywood sheets
- 3- 8′ 2x4s
- 1 – 4×8 pegboard sheet
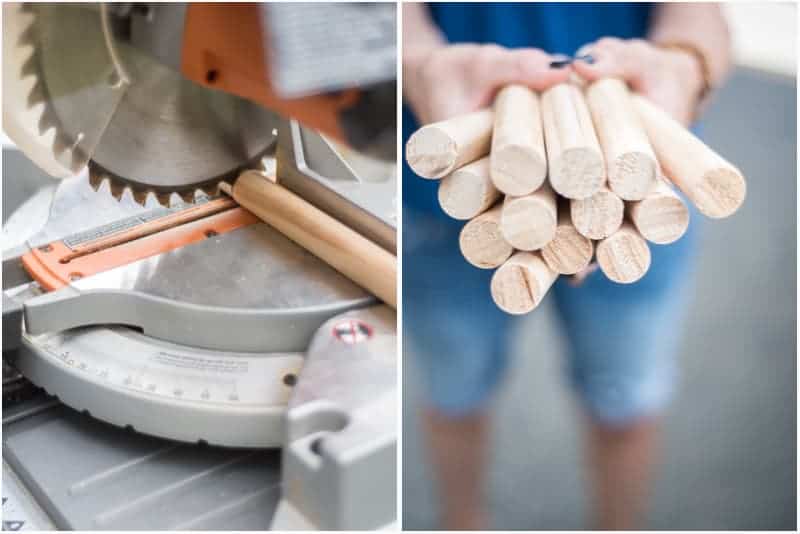
- 4 – dowel, 1″ diameter
- boards for shelves ( I used 1×8-6FT common board)
- wood screws
- wood for the desk top
- 2 – dowel, 2″ diameter
- paint ( My choices were In The Moment and Off The Grid from BEHR®)
- hardware ( I used pulls and doorknobs) from Liberty Hardware
Tools for the pegboard project:
- drill
- 1″ Forstner bit
- circular saw
- stud finder
- level
- safety glasses
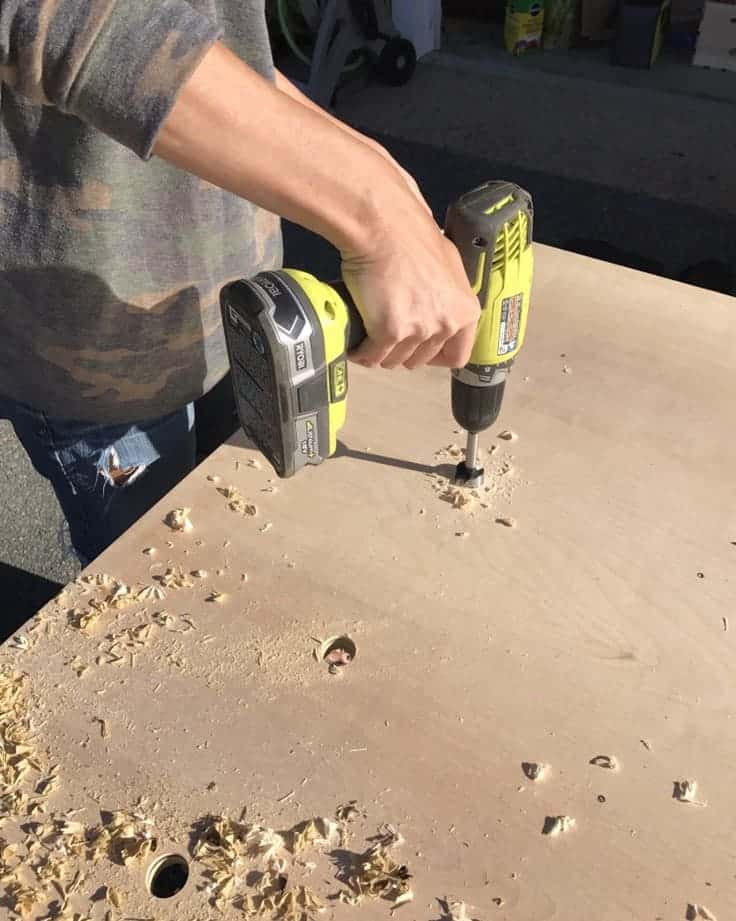
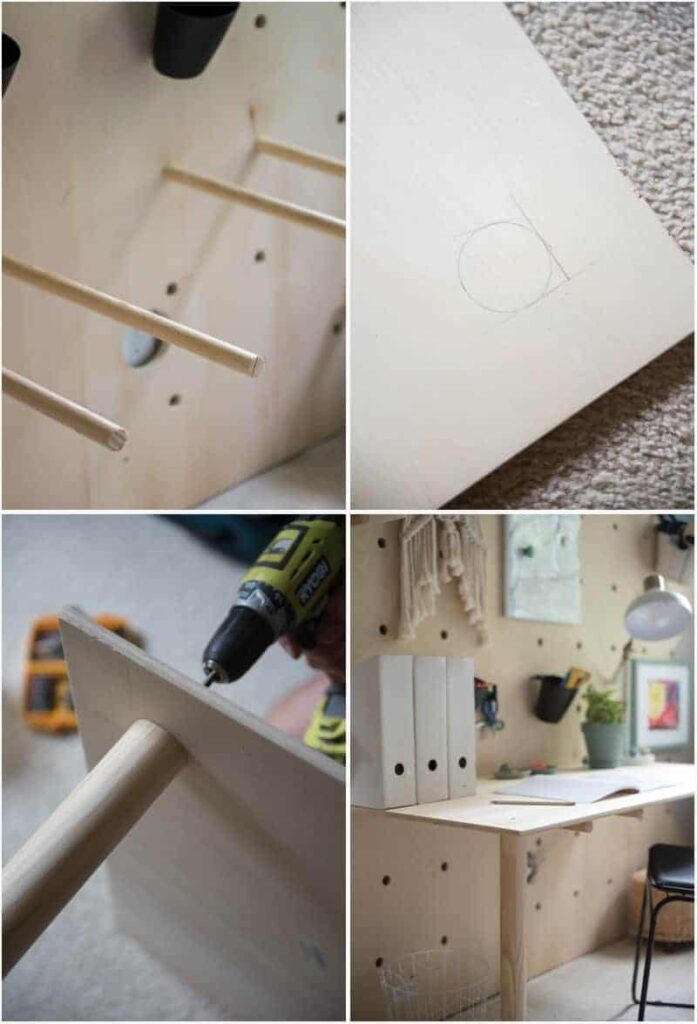
Cut the Pegboard holes…
To start the project, place the plywood on the ground and lay the pegboard on top of the plywood to mark out the holes. Using the pegboard will help to mark out the holes evenly. I measured every 9th hole horizontally and every 8th hole vertically. It didn’t take much time to plot out the holes, I promise. Use a pencil to make a mark (or scribe) through the pegboard. I drew lines on the pegboard creating squares, so the second time around it was a piece of cake because I already knew which holes to trace. Now start drilling all the holes you marked. We used a 1″ Forstner bit. My hubs is the best helper!
Add hardware to your pegboard project…
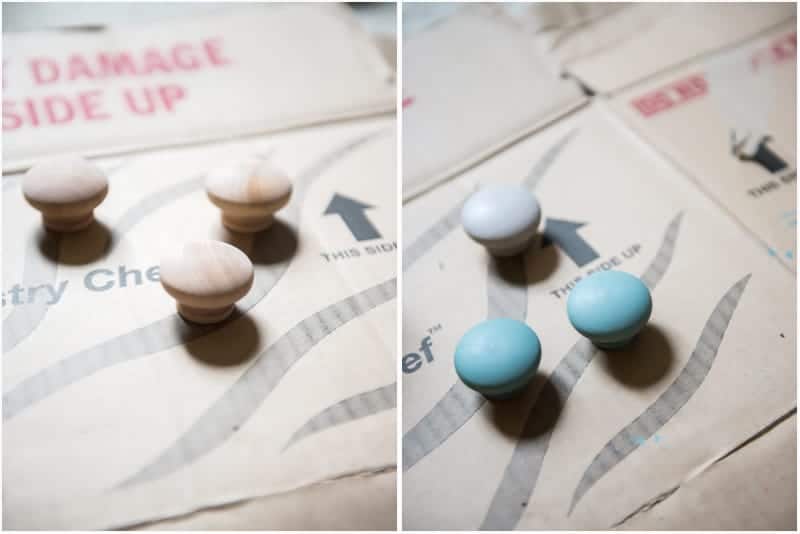
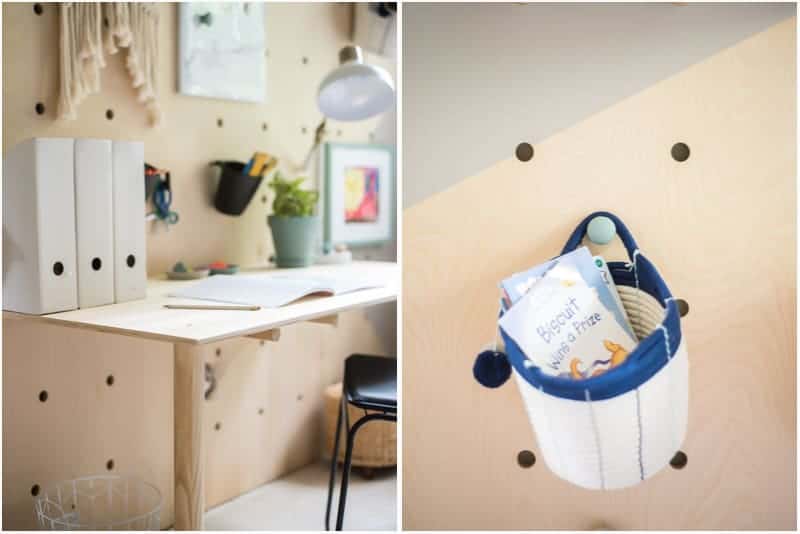
I wanted to add on hardware to the wall to hold pencil boxes and baskets to keep my kiddo organized, so before we hung our plywood sheets on the wall, we installed our hardware from Liberty Hardware. I found these fun wood knobs, and I also used some simple bar pulls. It is important to secure them before you hang the sheets of wood to the wall because you will not be able to access the back to secure knobs and handles once the ply wood sheets are mounted.

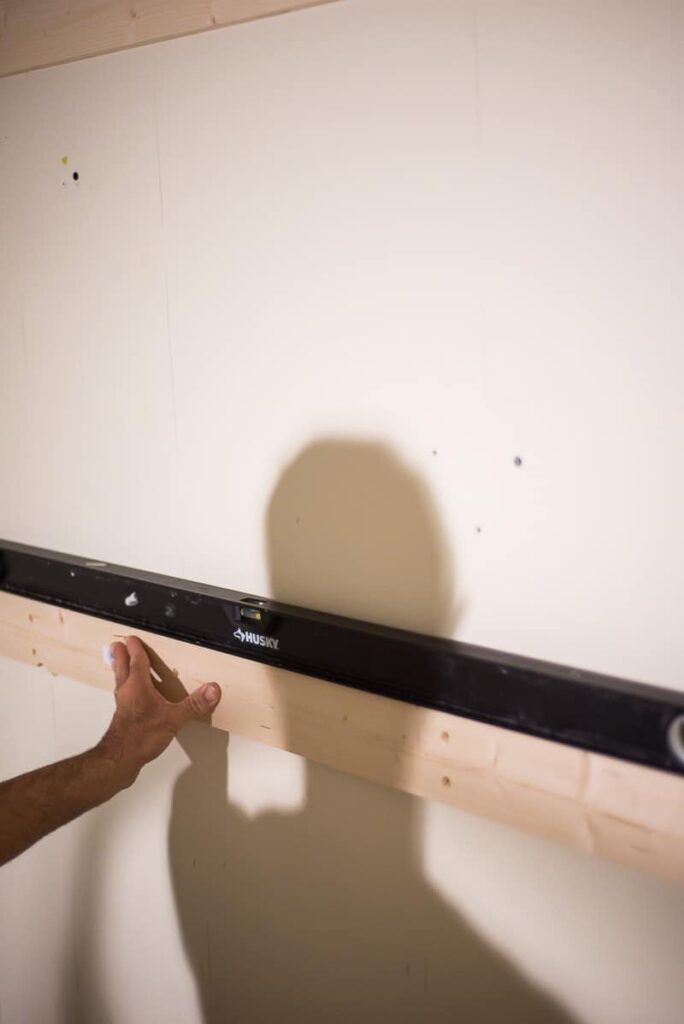
Securing the large pegboards to the wall safely…
Before you secure the plywood sheets to the wall, find the studs using a stud finder. These plywood sheets are super heavy, and you want to make sure that the wood is all well supported by the studs- not the sheet rock. Screw your 3- 2x4s into the studs leveling the boards horizontally . The first should be about 6″ from the top of the wall, then 6″ from the the bottom and the last goes across the middle section of the wall. The exact position is not super important – just make sure it will be where you cannot see it through the holes in your plywood. Use the level to make sure all boards are straight and mark or measure the 2x4s locations for the next step.
Use long wood screws to secure the plywood sheets (hanging them longways) to the 2x4s on the walls. Then determine where you will hang your shelves and add extra screws to make sure the splywood is completely secured but the screws are not visible.
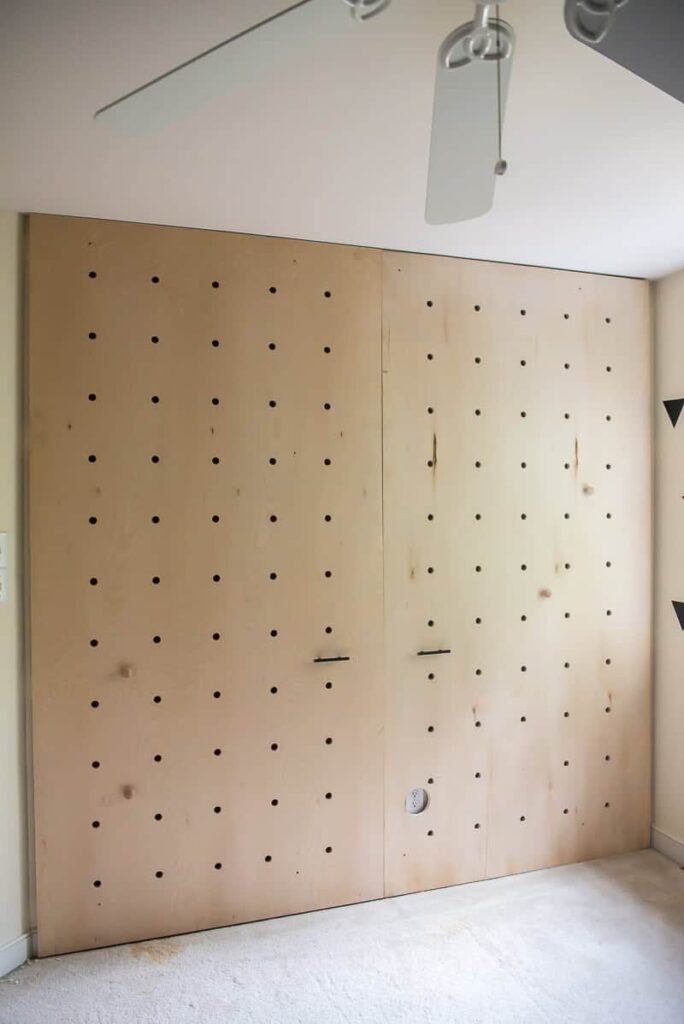
As you see in this image above, I also cut a hole out for the outlet, and I made it round to look cohesive with our project.
Taping and Painting your Pegboard Wall…
I taped off my triangles with painters tape and painted my design on using these trending colors, In The Moment and Off The Grid from BEHR®.

I painted my wood knobs as well.
Adding Shelves to your pegboard…
Cut the dowels to size. We cut down 1×8 wood boards to create the shelves. I cut my dowels 9″ long so the dowel could go into the holes and extend behind the plywood sheets.
I pushed the dowel pieces into the holes.


And then I added shelves. Once the shelves were placed where I wanted them, I secured them with a screw at the bottom of each dowel.

Creating a desk for your Peg Board Wall…
And last, I added the desk onto the wall. I used long dowel pieces to support the back of the desk, and I cut two sturdy legs using the 2″ dowel that we screwed onto stabilize the front of the desk. Voila!
I truly loved how this study area turned out! What do you think?
I added some personal touches as the last step, and my little monkey was ready to sit down to practice on his writing skills in style.


If you are crazy about this macrame make sure to check out my other macrame posts to make one yourself DIY MACRAME WALL HANGING and learn here first if you are a beginner MACRAME KNOTS .

And the obligatory BEFORE AND AFTER pics 🙂

PIN THIS PROJECT FOR LATER!!

I hope you got inspired today! Check out BEHR’s amazing colors for 2018. They are all fabulous.
Cheers,
Aniko
COMMON QUESTIONS:
Q: Can you tell me what drill and bit are you using for your plywood pegboard?
A: The drill is a batery operated Ryobi and I used a 1″ Forstner bit to create the peg board holes.
Q: Are you able to add more knobs after you put up the plywood?
A: Not these knobs. The knobs we used screw though the back of the board into the knob. Although, you can purchase knobs that screw in from the front like these.
Q: Are you able to add more dowels after you put up the plywood?
A: Sure! You can move them around as much as you want.
Q: Why did you use the plywood behind the peg board.
A: I used the pegboard only to measure out the holes on the plywood. The holes I drilled were a LOT bigger than the holes on the pegboard.
Q: What type of wood is shown in the photo. Any old kind of wood wouldn’t look nearly as nice as this exact stuff.
A: I used a 3/4 in. x 4 ft. x 8 ft. PureBond Birch Plywood. You can find it at a local Home Depot for about $50 /piece.


Did you need to prime the triangles before you painted on the colour? Or is the colour directly on the ply?
Thanks great job!
Wow! Love it! Awesome work – awesome post!
I really love the wall color, This looks amazing, Thanks for writing on an excellent idea. It would be enjoyed the big boy room.
We love it too! Such a great wall!:-)
Wondering if you filled in the screens on the play once it was hung or if you left them? I couldn’t see them in photos. Wanting to do this in my front hall for organization.
You mean seams on the plywood? I did not! I left it as is! Good luck:-)
no i mean screw heads
I would like to know if these pegboards can hold a 11 inch shelf with dishes as I would like to use in the kitchen for open shelving.
Mary,
I can’t tell you for sure if it will. I think it’s really important to make sure to secure the pegboard to studs, but I would have to test it to tell you for sure it would hold a shelf with dishes., Sorry if I wasn’t much of a help.
Could you share the spacing of your drilled holes? I’m making something similar and I was hoping to skip buying the pegboard to measure it out. Thanks!
Michael, The holes are 7″ apart. I hope it helps! Good luck:-)
Awesome makeover. Really this is a very fun project to create a PEGBOARD WALL. I like your plywood using tips and ideas. I have a small room but how to measure a pegboard for a small wall. I definitely try this for my home. Thanks for sharing your post.
Looks great.
For those wanting to source the best plywood in Australia go to http://www.trademaster.com.au
wow….thts amazing…It looks so elegent and stylish..loved it????
I love this so much!! Unfortunately we have plaster walls and I feel like I can’t safely attach anything to them without the wall crumbling. Any tips on working with a hundred year old apartment? Thanks!
Just amazing. I really like this. Can you tell me what drilling are you using for your plywood pegboard? I really need this. Thanks for sharing this.
Hello,
I used a 1” Forstner bit. Good luck! It’s a fun project! I am about to make another one for my other son’s room.:-)
Hi! So you used a 1” bit and 1” dowel rods for the peg? Does it fit snug or did you glue them in?
Lauren
I did not glue them. They fit snug.
OMG!!! What a great and unique idea! I was just thinking of some plywood pegboard to get a new look at the wall of my bedroom. Your ideas made me hurry to make some like yours! One more thing, the article was very easy to understand and to follow! Love them all! Thanks! 🙂
Your best peoject to date. Super cute!
Are you able to add more knobs after you put up the plywood?
Nope. The knobs screw on the back of the board.:-)
Are you able to add more dowels and knobs after you put up the plywood?
Why did you use the plywood behind the peg board. I haven’t looked at the thickness of pegboard but is that for strength to hold the dowels. I have an area under a staircase that I am changing into my daughters study area. she has a desk already but the pegboard idea would be great. She also wants a Harry potter under the stairs type of area for a reading nook as is into cubbies so could potentially use either the ply or the pegboard for that
Kim, I used the pegboard only to measure out the holes on the plywood. The holes I drilled were a LOT bigger than the holes on the pegboard.I hope it makes sense. I think it would be a great study area for your daughter.:-)
As a DIY’er, I really appreciate your DIY project, I’d sure appreciate knowing the type of wood shown in the photo. Any old kind of wood wouldn’t look nearly as nice as this exact stuff.
Rebekah- I used a 3/4 in. x 4 ft. x 8 ft. PureBond Birch Plywood. I hope this helps. You can find it at a local Home Depot for about $50 /piece.
Cool idea!
I love this!!!
Totally awesome!!!